
Main Table Of Contents
The Method
Contents...
• 6.2 Elminster's Initial Method
• 6.3.1 A clean installation of Skyrim Special Edition
• 6.3.4 The Unofficial Skyrim Special Edition Patch
• 6.4 Good Conflicts, Bad Conflicts
• 6.6.1 Step 1: Install a new mod and guess a good position in your load order
• 6.6.2 Step 2: Run xEdit with Very Quick Show Conflicts
• 6.6.3 Step 3: Change load order to resolve conflicts
• 6.6.4 Step 4: Identify the conflicts that shouldnt be ignored
• 6.6.5 Step 5: Save your created patches
• 6.6.6 Step 6: Create new ModGroups for each new mod
• 6.6.7 Step 7: Start over again
6.1 - Preface
You have probably all been at a point where you have maxed out Skyrims plugin limit or even went beyond that using MergePlugins and/or ESL flagging (see below) to stuff in all the awesome mods you have found on the Nexus (and perhaps that other site called LL too). But at some point you have encountered random crashes you could not fix. You have had inconsistencies like Unique Region Names only working on certain interiors. You have seen water seams, broken navmeshes, clipping and what ever else a heavily modded Skyrim may throw at you.
Perhaps you have given up at that point, deleted your mods, reinstalled Skyrim and started over again. Just to run into similar problems once that new modlist became bigger.
Perhaps you went back to the Nexus and finally read all the descriptions everyone told you to carefully read before. Perhaps you have spent hours and days digging out all the patches for the mods you use. And perhaps this helped. But more probably you could not fix every issue and just lived with what you have.
Or you asked people and read tutorials and finally loaded up your build in xEdit and checked for conflicts, looking forward to solve all of them to finally get the neat and tidy Skyrim you always wanted. Just to be shocked about a wall of red. It seemed like every single mod was conflicting with all your other mods even tho you have every single patch you have found.
This is the point where post people (including former me) just go Fuck this! I wont spend four hours a day for a month to fix this mess! and forget about that wall of red. Some chosen few might have actually accepted this challenge and fixed and patched all their mods until all conflicts were resolved. Those people are my heroes.
But theres a WAY easier way to do this - The Method!
6.2 - Elminster's Initial Method
The system Elminster has worked out uses the following principles.
Initially:
• start with just vanilla load order (game.esm, update.esm, DLC)
• add the Unofficial Patch for your game (name varies, e.g. USSEP for SSE)
• create mod group for all now installed files to get you to show 0 conflicts after running -veryquickshowconflicts (the assumption here being that the UP will fix up any internal issues between the official files, and you don't need to see any of that mess anymore)
Then, for each mod you install repeat:
• install mod
• run -veryquickshowconflicts (will ONLY show conflicts caused by that new mod now)
• look at conflicts to see if they can be fixed or minimized by changing load order or run cleaning (on the new mod or another), if yes, do so and then run -veryquickshowconflicts again
• look at conflicts to see what needs to be patched (you can also check if any premade patches are available and install them), when creating patches, try to to make it small focused ESL flagged patches, for just a pair of mods (make sure to save all your patches before going to the next step to have their CRC calculated)
• after everything has been patched and you are sure everything that now shows as conflicts is false positives, create mod groups to hide them (again, small focused mod groups for particular conflicts between 2 mods, not one huge one for everything)
• run -veryquickshowconflicts one last time to make sure you are back to 0 conflicts showing
• repeat for next mod
You should review this as it is the basis for what The Method is. The following information in this section was adopted from elwaps guide and uses the above guidelines.
6.3 - Prequisites
6.3.1 - A clean installation of Skyrim Special Edition
You either need to start over with a fresh install of Skyrim SE or take your current build and deactivate all mods so that your plugin load order, again, is vanilla. This might help you going back to vanilla SSE in an efficient way but be aware that guide was written for Oldrim. If you want to be absolutely sure and have a reasonable internet connection just uninstall Skyrim from Steam, delete the remaining folder with everything in it from \steamapps\common\, delete everything Skyrim-related from your My Documents folder and perhaps even check your AppData folders for remains of the tools you might have used in the past. Then reinstall through Steam.
6.3.2 - A proper mod manager
Make sure to use a good mod management tool like Mod Organizer 2 (MO2), Wrye Bash, or Vortex. For using The Method manual mod management is not posible, don't even think about it.
The community version of Nexus Mod Manager is at v0.71.1 and maintained by DuskDweller. Most anyone will suggest one of the other three mod managers listed since NMM is unsupported by the Nexus in favor of Vortex. Some feel it has many unresolved issues but if you are using it and do not wish to update, at least get the latest community version.
While you may use any mod manager there will be suggestions for how to handle files that appear in the MO2 overwrite folder.
6.3.3 - xEdit
Make sure you have an up to date version of xEdit installed, we will need this alot!
6.3.4 - The Unofficial Skyrim Special Edition Patch
Before starting with The Method you should make sure to have the Unofficial Skyrim Special Edition Patch (USSEP) loaded. This isnt entirely necessary for The Method but good practice anyway.
6.4 - Good Conflicts, Bad Conflicts
The Method is all about conflict resolution. A conflict is a record from one mod overwriting the same record from another mod. There are intended conflicts and problematic ones. Heres examples for both.
• A certain tree might have a size (scale) of 1.0 in vanilla Skyrim. Enhanced Landscapes, which is loaded after Skyrim.esm, might scale the same tree bigger and give it a value of 1.2. As EL is loaded after Skyrim.esm the value of EL wins and the tree will have a scale of 1.2 ingame. This is a desired conflict such as almost all cases where mods overwrite values from the vanilla game, we don't need to fix that.
• When you are facing a door leading to the wilds in an English version of Skyrim the door will always show Skyrim. But if a mod author have a localized version of the game and does his or her magic in the Creation Kit the region records in the resulting mod might be called Himmelsrand or Borderciel. If that mod is the last plugin that changes a record it will overwrite Skyrim with the localized name and you will get those translated names in some locations ingame. Thats a conflict we need to fix.
• you are using Realistic Water Two, a mod that changes the water type of alot of rivers and lakes. Lets say you have Arthmoors Cutting Room Floor loaded after Realistic Water Two. Now, if RWT defines a certain body of water as DefaultMarshWater but gets overwritten by CRF, which might use RiverWaterFlow, the desired value from RWT gets overwritten and you might have a water seam ingame. Thats a conflict we need to fix too.
• You have a mod that adds an awesome looking weapon that have totally ridiculous stats. Someone else made an addon for that mod with more reasonable values and that addon is loaded after your weapon mod. In that case the damage values of the addon would overwrite the ones from the weapon mod thus creating a conflict. But as you have installed the addon to do exactly that we have a desired conflict we don't need to fix.
Just ignoring all conflicts and hoping for already available patches to fix them might work on some smaller modlists. But at some point you will encounter strange behaviour, inconsistencies or worse. This is why were having an eye on conflicts throughout the creation of our modlist. Thats the core of The Method.
6.5 - The First Step
You will need to set up your mod manager to run xEdit in Very Quick Show Conflicts mode.
Now that we have USSEP installed we know it corrects many aspects of the vanilla game. We should expect other mods will conflict with vanilla records and USEEP. Because USSEP overwrites many of the vanilla records in order to fix bugs we won't need to examine them and can acknowledge all those conflicts should be there. This is done by creating a ModGroup form within xEdit.
Starting with version 4.1.7 the Unofficial Skyrim Special Edition Patch now comes with its premade ModGroup. If you are using that you can continue to Implementing The Method.
However, if you wish to follow along with the next parts of this guide and make a ModGroup, you should delete the ModGroup that comes with USEEP. Rearranging the guide will take a little while so it is recommended you only delete the ModGroup provided with USSEP. While you follow along with the next parts of this section, you will create your own USSEP ModGroup. If you chose not to delete the ModGroup provided with USEEP you can at least read the rest of this section so you know what ModGroups are about.
For MO2 users you would double click the mod, go to File Tree and delete the Unofficial Skyrim Special Edition Patch.ModGroup file.
Once you have launched xEdit with Very Quick Show Conflicts xEdit will scan your current modlist for conflicts. After it finishes loading you will see your current list of plugins (Skyrim.esm, SkyrimSE.exe, Update.esm, Dawnguard.esm, HearthFires.esm, Dragonborn.esm and Unofficial Skyrim Special Edition Patch.esp) highlighted in red on the left side of xEdit. Normally we would expand the plugins in that list to see what the detected conflicts are all about but this time we just want them out of the way.
The View Tab for xEdit will show the comparison for the selected record. For this guide we will use screen shots like the one below to illustrate what would be difficult to show in xEdit.
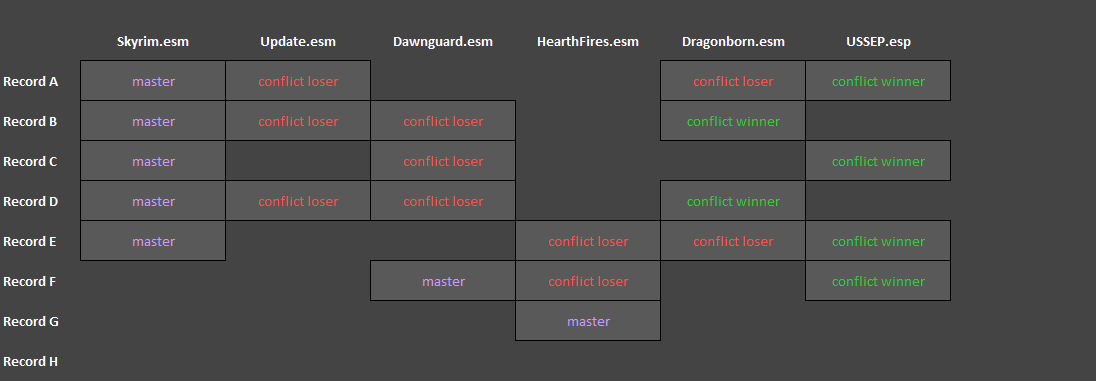
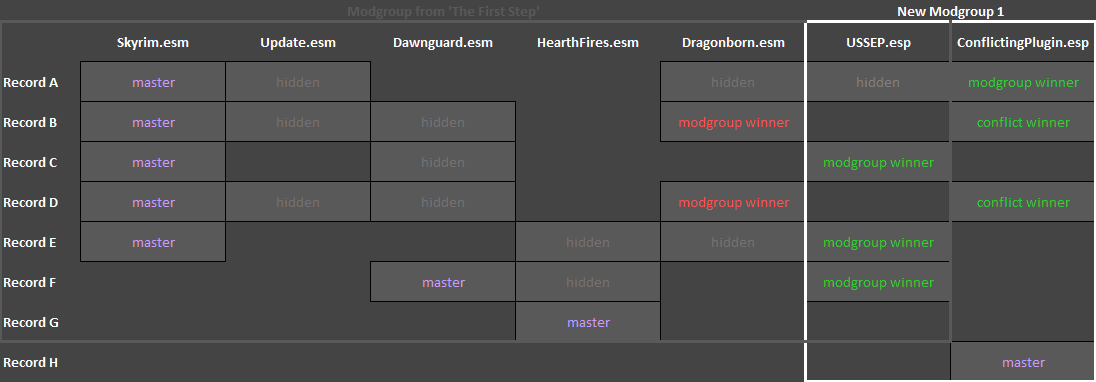
The master records are the first versions of any record. Record A for example makes its first appearance in Skyrim.esm, Record F is first seen in HearthFires.esm. The conflict winners are the versions of any record that are loaded last and aren't overwritten by another version of the same record. Those are the values you will experience in-game. Everything in between are conflict losers, they are overwritten and wont make it into the game.
On the first screen you can choose which plugins will be part of that mod group. Make sure all of them are checked and hit OK. On the next page you can enter a name. Choose one that makes sense like USSEP and hit OK. On the third page xEdit wants you to choose a plugin to attach that modlist to. As the modlist is needed for the conflicts caused by USSEP attach it to USSEP and hit OK. On the last page xEdit wants to know which ModGroups should be active. On this page always make sure to have all ModGroups active and hit OK. This is how the above situation would look after creating this first ModGroup:
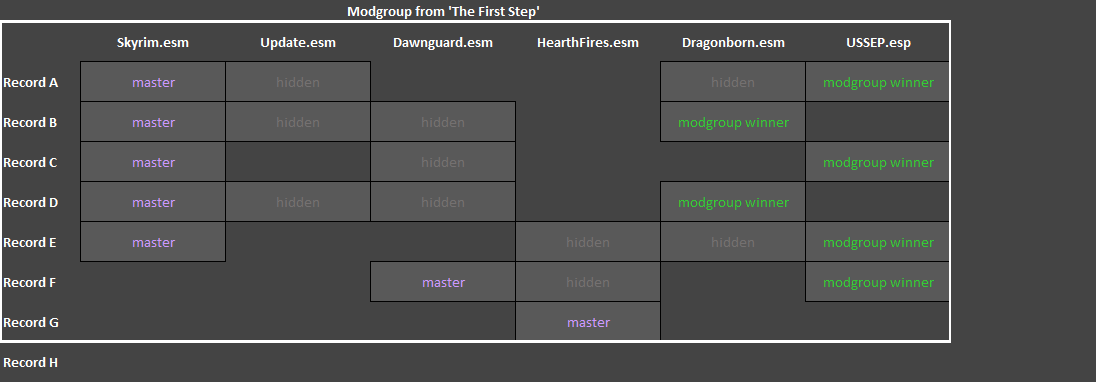
The ModGroup hides all conflict losers of all plugins that are part of the ModGroup. Whats left are the masters that are always visible when theres a conflict. And the conflict winners.
Re-open xEdit from your newly created ModGroup and make sure there are no conflicts left. The Navigation Tree which previously showed your conflicting plugins should now be empty. This is because conflict winners overwriting their masters are not regarded as conflicts and conflict losers in your ModGroup are ignored for conflict checking.
If using MO2 close xEdit and move the new ModGroup from your overwrite folder to your Unofficial Skyrim Special Edition mod folder in the left pane of MO2. This can be done by double clicking overwrite and just dragging the .ModGroup file into your USSEP mod. It is best to keep the ModGroup with the mod. That way if you deactivate the mod its ModGroup will not show up in xEdit.
If you are still unclear about how to create your own ModGroup remember to review the section on Creating a ModGroup form within xEdit.
6.6 - Implementing The Method
Now that we have an empty conflict list you are ready to choose the first mod you want to add. Mods affecting many regions of the game are advised to be added first. Such mods would be Realistic Water Two, Unique Region Names, and Missing Encounter Zones Fixed. Theoretically the order of installation does not really matter. You should order mods so that those making the most changes to the game world are loaded early, and those that make less changes to the game world load later. This will save you some trouble while resolving conflicts with mods like Unique Region Names because there will be conflicts with almost every single mod in your load order that would take a lot of work when added late in this process.
What follows should be repeated for every new mod you add and is the core of The Method.
6.6.1 - Step 1: Install a new mod and guess a good position in your load order
Determining load order will become easier with practice. Once you realize that every other player home will overwrite lighting values of Enhanced Lighting for ENB with vanilla Skyrim stuff you will place them before ELE. Putting Unique Region Names or Arthmoor's Karthwasten below the two mods its made for is pretty obvious. Having a mod changing a few locations like Skyrim Bridges below a mod like Enhanced Landscapes that touches almost every region of the game is best.
After adding new plugins you should clean them using Quick Auto Clean. You can set up your mod manager to run Quick Auto Clean the same way you did with Very Quick Show Conflicts. You may also want to run the Check For Errors If the mod is full of them then you should reconsider using it. Be sure to read the section on check for errors because some may be issues that should be resolved by the mod author, while others are not really errors. Asking in the xEdit Discord for clarification is okay but please read the section on Check For Errors first!
6.6.2 - Step 2: Run xEdit with Very Quick Show Conflicts
Very Quick Show Conflicts displays all conflicts the new plugin causes. Rightclick somewhere in the right pane, where all the records are listed, and choose Hide no conflict and empty rows to make things more clear and actual conflicts more visible. If we sticked to our example from above you would notice that only Dragonborn.esm, USSEP.esp and our new plugin would be listed as conflicting in xEdit. This is because all conflicts with Update.esm and Dawnguard.esm are hidden by our ModGroup and as HearthFires.esm have no records conflicting with our new plugin at all.

6.6.3 - Step 3: Change load order to resolve conflicts
Go through all the conflicts and check if changing its position in your load order could fix them. If it seems like a change in load order could fix most of them (like when a mod overwrites changes from another mod with empty values everywhere) leave xEdit, change your load order manually in the right pane of MO2 and come back to see if this fixed the issue.
6.6.4 - Step 4: Identify the conflicts that shouldnt be ignored
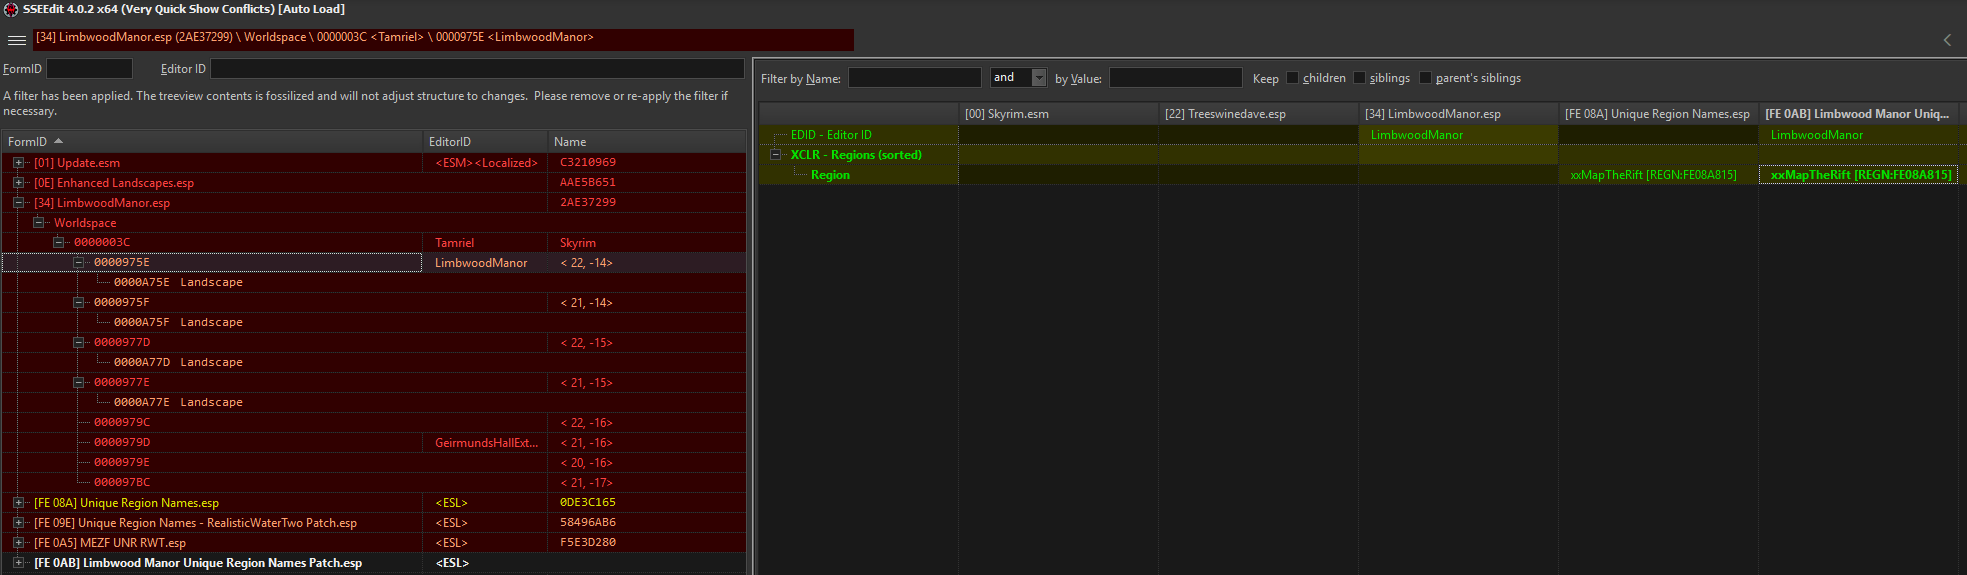
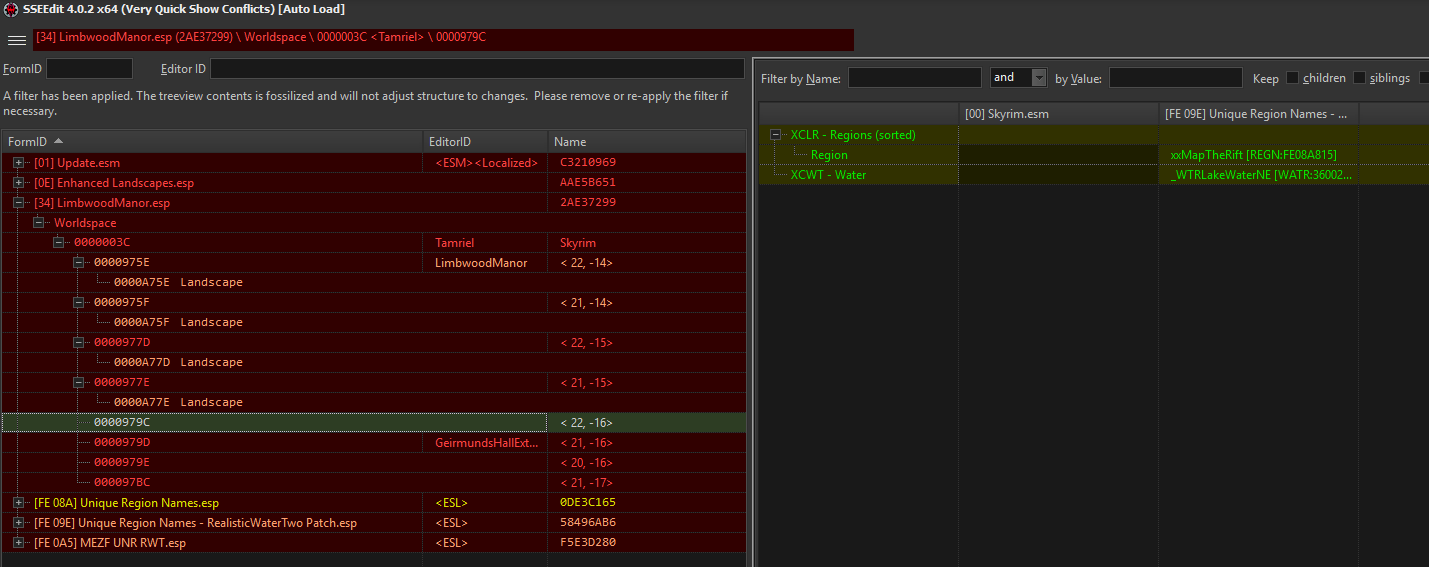
For example, if a mod defines a water type for a certain area but this change gets overwritten by the water type of Realistic Water Two it can safely be ignored as you want RWTs water type to win. But if a plugin have new entries that overwrite other entries of another mod and the other way around you would need a patch. See an example for this in the screenshot below.
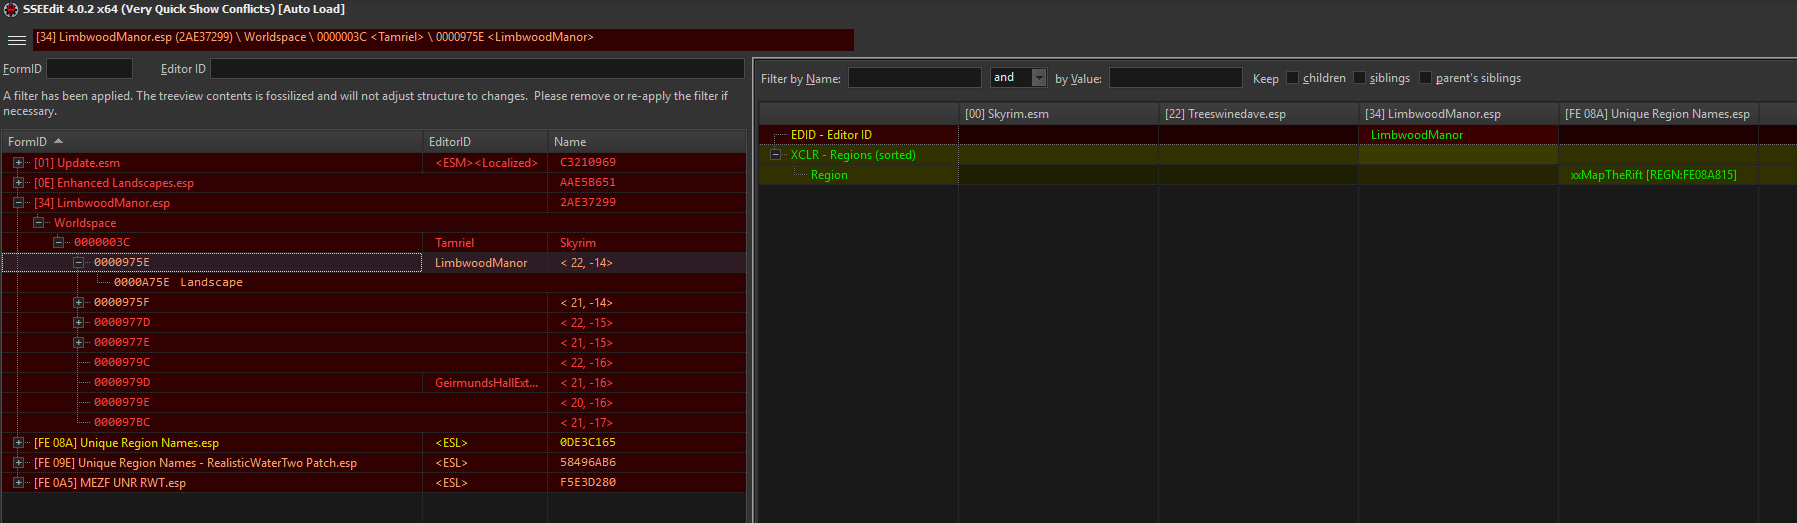
Even tho an overwritten EditorID will only bother us if were planning to work with Limbwood Manor in Creation Kit it is still a good example what a conflict that needs to be patched looks like. Here, Unique Region Names does its thing and adds a Region record that renames the region (from the regular Skyrim) to The Rift. As URNs EditorID line is empty Limbwood Manors record gets overwritten with nothing. If we switched the position of those plugins in our load order Limbwood Manors EditorID would survive but URNs region name would be overwritten. As we don't want either to happen we need a patch.
The first step is rightclicking LimbwoodManor.esp at the top and choose Copy as override into.... In the new window scroll to the bottom and choose <new file>.esp [Template] ESL, that way the patch wont count against Skyrims regular plugin limit (see below). Then chose a reasonable name like Limbwood Manor Unique Region Names Patch and thats it, now we have our new patch plugin that you can see in the screenshot on the far right side. But in this state it is nothing but an exact copy of LimbwoodManor.esps records, in this state URNs region record gets overwritten.
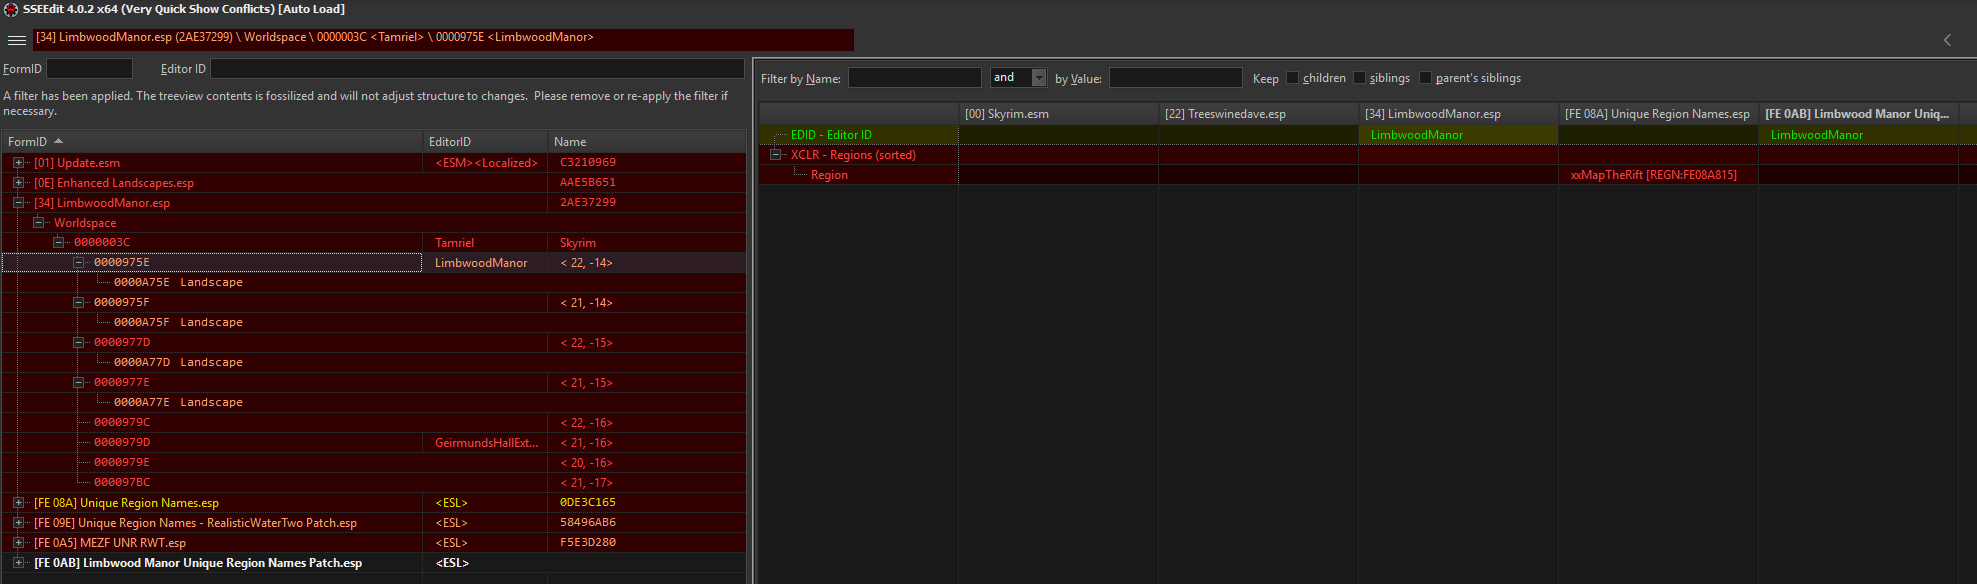
For our new plugin to be a patch we should now drag the xxMapTheRift record from Unique Region Names.esp into the empty Region field of our patch. xEdit will ask if it should add Unique Region Names.esp as a master to our patch. This means that the patch can only be activated if URN is activated as it refers to a record that is only present in URN. But thats fine, without URN our patch would not make sense to be active anyway so hit Yes.
This is the result. Our patch will be loaded after both mods and contains the records of both of them. Neither the EditorID from Limbwood Manor nor the Region from Unique Region Names gets overwritten anymore and everyones happy. Conflict resolved.
As a final step click on your newly created patch in the left pane of xEdit. You should be able to see the masters of that patch which in our example should be LimbwoodManor.esp and Unique Region Names.esp. If one (or both) of them are missing right click your patch and choose Add Masters.... In the new window check the mods your patch is for and hit OK. This isnt entirely necessary but good practice. If you plan to publish your patches everyone using LOOT will thank you for this. As a final touch you can add your name to the author record - congratulations, you are now officially a mod author. Wasnt that hard, was it?
This is basically how simple compatibility patches are created. I know this requires some routine and experience and I am still unable to fix all kinds of conflicts mself. But when in doubt join the xEdit Discord and ask for help in #cathedral-of-the-method. don't be shy, clarifying things is how you will learn this.
6.6.5 - Step 5: Save your created patches
Once you have created patches for all conflicts that you think shouldnt be ignored close xEdit and save them.
Make sure all your new esps are in the list and checked. Once you are back to MO2 you will find your new patches in the overwrite folder at the bottom of your modlist. Its not good practice to have plugins lying around in there so if you only create a single patch (and you are sure theres no other crap left in overwrite) you can create a new mod out of your overwrite folder via rightclick and Create Mod...
If you created more than one patch the easiest way is to open your overwrite folder in Windows Explorer (rightclick, Open in Explorer) and create new folders for all your new plugins. Then drag your plugins into the respective folders and simply move those folders from \Mod Organizer 2\overwrite to \Mod Organizer 2\mods. Once you refresh MO2 (hit F5) your patches will show up in the left pane.
Even tho it is entirely up to you how you name and manage your mods in MO2 this almost empty modlist would be a good point to think about a proper sorting and naming scheme. You will be thankful for this once you have a few hundred mods in your left pane and need to use the search function to find them. Call me an autist but this is how I manage mine:

Once you have acivated your patches the plugins will show up at the very bottom of your load order in the right pane. Depending on lour load order and other patches you might want to change the load order spot of your patch but at least for the first one you don't need to change anything.
6.6.6 - Step 6: Create new ModGroups for each new mod
You would open xEdit for each new module with Very Quick Show Conflicts and create ModGroups for all plugins with intentional conflicts.
After creating all the patches we need only intentional conflicts are left now. For those we should now create ModGroups to get them out of the way for conflict checking the next mod. Of course we could just create one large ModGroup containing all conflicting plugins but you will realize this isnt the best approach. If we will later disable one of the mods of this combined modlist the entire modlist isnt working anymore and we will be presented with a huge amount of conflicts we will need to re-check. This will get really annoying once your modlist has grown larger.
Instead we will create one ModGroup for every two plugins with intentional conflicts. The ConflictingPlugin.esp from our basic example from above have conflicts with Dragonborn.esm and USSEP.esp so we will create a ModGroup for each of those conflicting plugins. As you can see, the first ModGroup only hides the conflicting Record A with USSEP.esp and the same record from our ConflictingPlugin.esp is the conflict winner in the new ModGroup. That way, if the next plugin you add conflicts with Record A, it will only be shown conflicting with that record from ConflictingPlugin.esp.
The same goes for Record B and D from Dragonborn.esm. ConflictingPlugin.esp is the new conflict winner in our second new ModGroup and if the next plugin you add will conflict with either Record B or D the records of Dragonborn.esm will not be shown, instead xEdit will only show the conflicts with ConflictingPlugin.esp.
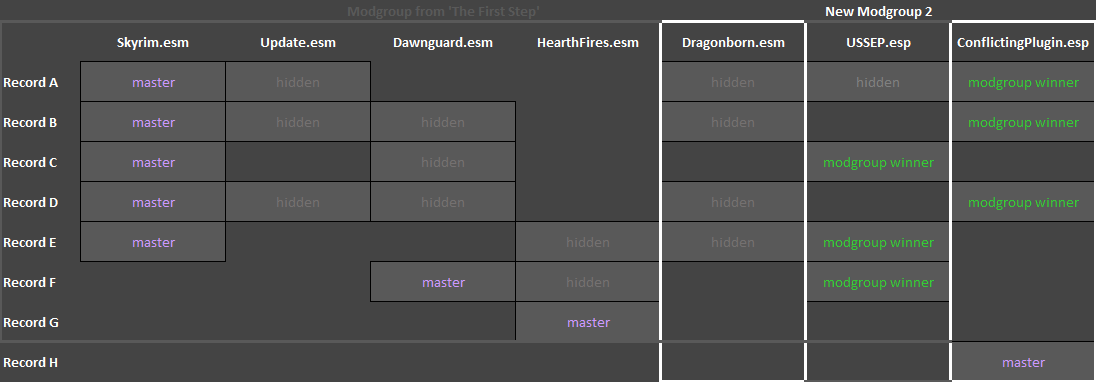
In general, by creating a new ModGroup for every plugin our new mod is conflicting with we will hide those conflicting records and only the respective conflict winner in our ModGroup will be shown once we add the next plugin that conflicts with one of these records.
Here's another practical example:
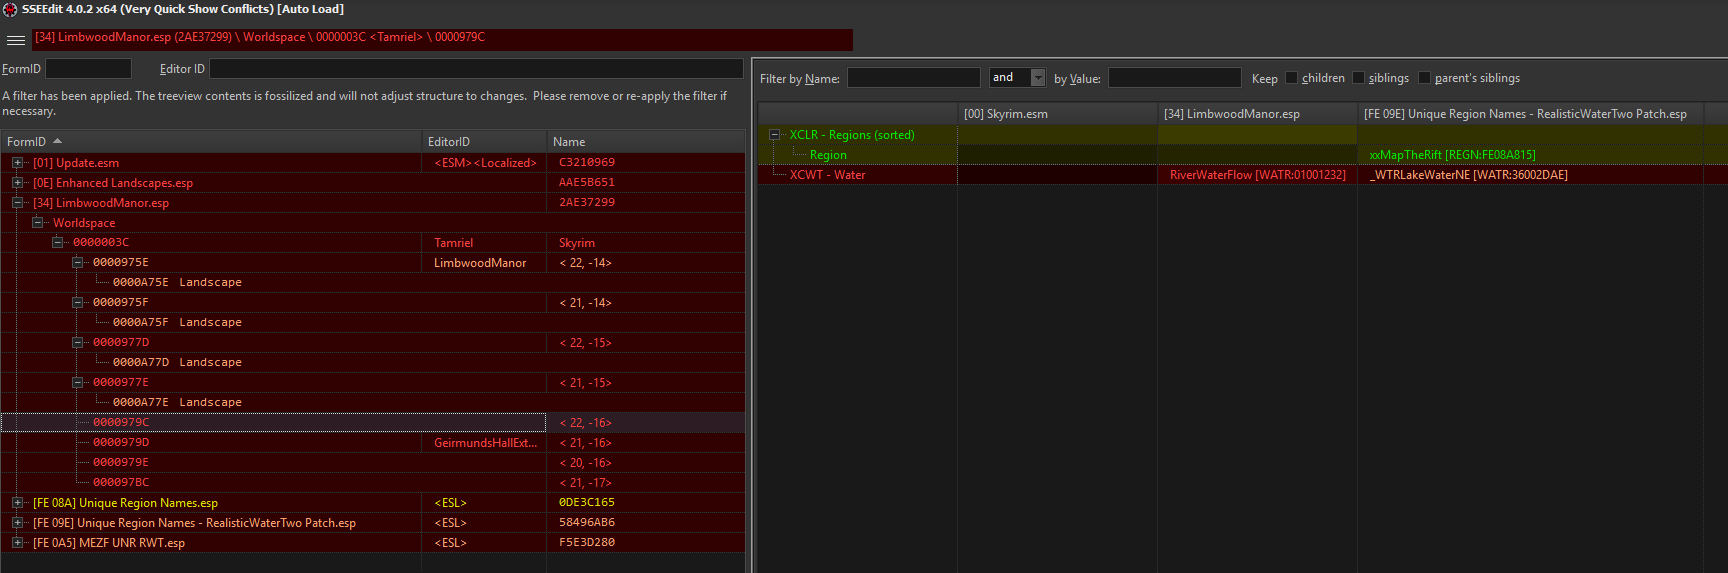
Here we can see LimbwoodManor.esps water record is overwritten by the one from Unique Region Names - RealisticWaterTwo Patch.esp. After checking all conflicts between those two plugins (which can be easily done by checking the records of Unique Region Names - RealisticWaterTwo Patch.esp instead of the LimbwoodManor.esp ones) and realizing that they can all be ignored were putting both mods into a new ModGroup.
The process of creating that ModGroup is basically the same as described above in The first Step. But this time, instead of selecting all plugins on the left side and stuffing them all into a ModGroup we will rightclick Unique Region Names - RealisticWaterTwo.esp in the headline top right and create a new ModGroup from there. In this case only Unique Region Names - RealisticWaterTwo.esp and LimbwoodManor.esp should be eligible for our ModGroup but if xEdit presents you with more than two plugins make sure you only select the two conflicting plugins. The rest is exactly the same as described above.
Once we created that ModGroup the same window in xEdit should look like this:
Once you have created all ModGroups needed to hide those intentional conflicts exit xEdit, sort them into their respective mods and re-open xEdit to make sure the left pane is empty. If so, all conflicts are either solved via patches or hidden by ModGroups. If not you should go through the remaining conflicts and repeat steps 4 to 6.
6.6.7 - Step 7: Start over again
Once the next plugin is added you will realize why we went through the hassle to create ModGroups. Only the conflicts created by that new plugin will be shown with all the stuff from previous plugins out of the way. In the long term this will make conflicts way easier to handle. No more staring at red walls and giving up.
A quick word about LOOT: The original author of this guide has around 1200 plugins and to resolve all the conflicts prefers to use his own sorting methods. If you use this guide as is intended from the beginning and if you are adding the masters to the patches LOOT will sort the plugins after their masters automatically. As you use Very Quick Show Conflicts and review how the mods are sorted with LOOT you will know when to add additional sorting rules for your installed mods to ensure the conflicts are resolved properly.
Last but not least a quick word about conflicts that cant be handled in an easy way in xEdit like objects clipping into each other. After sorting and patching my newly added plugins I usually go ingame and check all the locations the new plugins are touching. You should really do this if you are using major landscape changing mods such as brilliant but super incompatible Enhanced Landscapes and try to add player homes or similar things adding stuff to the game world. If I see clipping I open the console (using the awesome More Informative Console), click the object and take a screenshot. Thats what I took the screenshot below for. I then go to xEdit, search for the Ref IDs from my screenshots, copy them as override into a new patch (see above) and set their record flags to Initially Disabled. That way those objects wont show up ingame anymore.
Finally a line about USSEP. While I am checking conflicts of newly added plugins I sometimes stumble upon mods overwriting USSEP changes with stuff from Skyrim.esm. In these cases I just drag USSEPs changes directly into the plugin that does the overwrites and by that create myself an USSEP version of that mod. This is the only case where I directly edit plugins, for everything else you should really create separate patches.
6.7 - Credits
• elwaps, for creating this guide to The Method