
Main Table Of Contents
xEdit Managing Mod Files
Contents...
• 8.2 Adding Master Files to a Plugin
• 8.3 Adding ESL flag to a Plugin
• 8.4 Adding ESM flag to a Plugin
• 8.6 Merging a Plugin into another Plugin or Master
• 8.7 Converting a Plugin into a Master
• 8.8 Splitting a Plugin into a Plugin/Master Pair
• 8.9 Comparing Two Versions of a Mod
• 8.10.1 Important dangers when compacting FormIDs
• 8.10.1.1 First Important danger when compacting FormIDs
• 8.10.1.2 Second important danger when compacting FormIDs
• 8.10.1.3 Third Important danger when compacting FormIDs
• 8.10.2 When it is safe or not safe to add the ESL Flag
• 8.10.4 Adding the ESL flag for mod users
• 8.11 How ESL enabled games handle FormIDs for ESL flagged files
• 8.11.1 How ESL enabled games address records within plugins
• 8.11.2 The ESL address format
• 8.11.4.2 ESLifying Plugins the easy way
8.1 - Overview
This chapter is dedicated to mod authors, and describes a number of functions and actions that xEdit provides to make mod authors lives easier and their products more standardized. Like the chapter on Mod Cleaning and Error Checking, these functions hole mod authors produce products that will be less conflicting with other mods, and will open doors to possibilities that mod authors may not have known existed. Actions like merging mods, splitting them apart into Plugin/Master pairs, adding Master file references and more are documented in the sections below.
8.2 - Adding Master Files to a Plugin
To reference a record from ExampleMaster.ESM in Plugin.esp you need to add ExampleMaster.ESM to the MASTer list in the File Header of Plugin.esp. This allows the plugin to add/change items found in the ExampleMaster.ESM. xEdit does this by adding a new master to the MAST sub record in the file header and correctly renumbering the FormIDs in the module. This can be very handy for mod authors, as it simplifies the process down to a few mouse clicks, so the mod author can focus on more important things like modding!
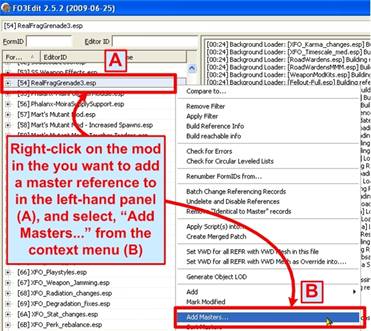
In this example we showcase Saiden Storm's Weapon Effects mod and the taylorsd's Better Frag Grenade Physics mods, two excellent enhancements to Fallout3. Here we will add the SS Weapon Effects.esm Master file to the Better Frag Grenade Physics plugin, so that we can add one of Saiden Storm's cool plasma blasts to a frag grenade for kicks! To start the action, select "Add Masters" from the context menu as shown:
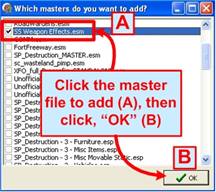
This will present the File selection menu, from which you can Check the Master file(s) that you want to add as references in the Plugin's header as shown:
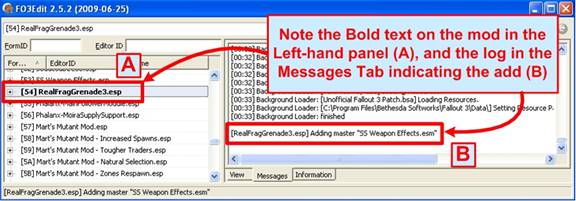
Once xEdit adds the master file as a reference in the Plugin, you see results similar to the screenshot below showing the Messages Tab log-entry:
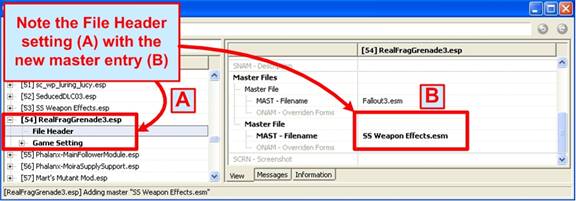
Note that "SS Weapon Effects.esm" has now be added to RealFragGrenade3.esp, making it possible to attach one of Saiden Storm's Weapon Effects explosions to the grenade effect in Better Frag Grenade Physics. The View Tab shows the specific entry:
Note: If you plan to release a mod to the public, then you should ONLY do this with permission from the modauthor, in this case Saiden Storm. If you wanted to use his weapon effects in a mod of your own and release it, you need permission!
Below Elminster describes why this function is important for mod authors wanting to add master file references to their own mods:
Elminster
"With FormIDs it's important to realize that the FormIDs that xEdit shows you are NOT the ones that are actually written into the module file. The FormIDs that xEdit shows you are "load order corrected" ones, while the FormIDs in the file itself are "file specific" ones.
FormIDs are made up of 2 parts, the first byte (2 characters) is the "module index", the last 3 bytes (6 characters) are the "module specific ID".
Mapping from "file specific" to "load order corrected" FormIDs and back only affects the "module index" and leaves the "module specific ID" untouched.
An example, suppose you got a bunch of modules loaded:
• [00] Fallout3.esm
• [04] MasterA.esm
• [10] MasterB.esm
• [15] MasterC.esm
• [20] Plugin.esp
And lets suppose the MAST sub record in the File Header of Plugin.esp lists:
• Fallout3.esm
• MasterB.esm
• MasterA.esm
If you now see a record in Plugin.esp that overrides a record from Fallout3.esm, then you would see a FormID like 00123456 for it. In this particular case that record would also have the same (00123456) FormID inside the Plugin.esp module file.
But if you have a record that overrides a record from MasterA.esm, e.g. with a FormID like 04ABCDEF (you can see the 04 as "module index" matches the load order of MasterA.esm) then it would be saved as 02ABCDEF in the Plugin.esp module file, because 02 is the index of MasterA.esm in the list of MASTer files in the File Header of Plugin.esp.
And an override for a record in MasterB.esm (e.g. 10654321) would be saved as 01654321 in the Plugin.esp module file because 01 is the index of MasterB.esm in the list of MASTer files in the File Header.
Last but not least, a NEW record in Plugin.esp which belongs to Plugin.esp and which xEdit would show you e.g. as 20FEDCBA gets stored as 03FEDCBA in the file (because 03 is equal to the number of entries in the MASTer list, as indices into that list start at 00, 03 is one higher then the highest valid index into that list).
You will also notice that it's not possible to have an override record for a record from Master3.esm in Plugin.esp or in any other form reference such a record, because there is no way to map a load order corrected FormID of 15A1B2C3 to a file specific one that's valid in Plugin.esp.
To reference a record from Master3.esm in Plugin.esp you need to add Master3.esm to the MASTer list in the File Header of Plugin.esp. But if you just go there and do that manually, then you've just added Master3.esm with the index 03 to the file. Which means that all the records that used to belong to Plugin.esp are suddenly considered override records for records from Master3.esm and will show up with 15xxxxxx FormIDs instead of 20xxxxxx FormIDs! A real mess.
If you instead use the Add Masters function, then xEdit will not only add then new entry into the MASTer list, it will also renumber all (file specific) 03xxxxxx FormIDs into 04xxxxxx FormIDs first to preserve their meaning (which is "this record belongs to this file").
There are rare cases where editing the MAST list directly is what you actually want. e.g. when splitting an .esp into an .esm/.esp pair. In that case you would make a copy of the .esp, rename it to .esm, load it alone into xEdit to set the ESM flag in it's header, then restart xEdit to load both the .esm and the .esp and modify the MAST sub record in the File Header of the .esp by adding the .esm as last entry. After restarting xEdit and loading both files you will see that all records in the .esp are now considered overrides for the same records from the .esm"
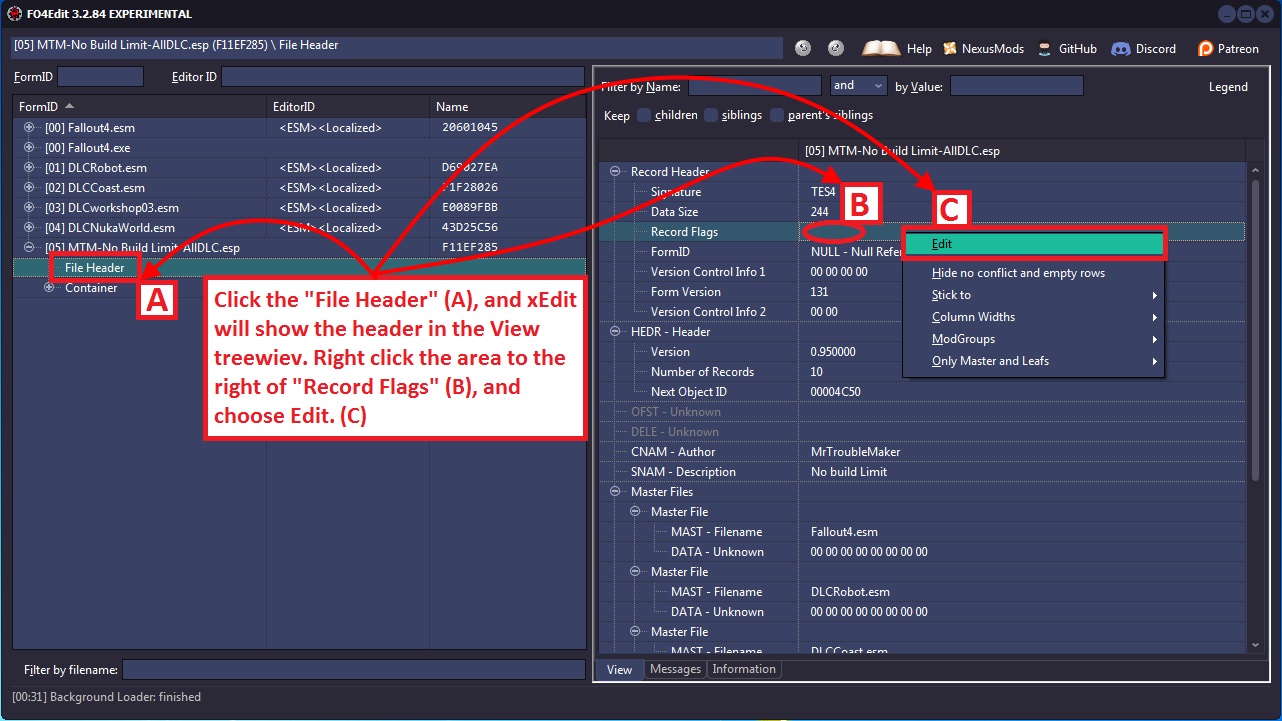
8.3 - Adding ESL flag to a Plugin
Load the module you would like to add the ESL flag to and click the plus by the filename to expand the contents. Click File Header, right click in the View Treeview and choose Edit to be presented with a list of Flags.
Check the box next to the ESL flag and click Ok.
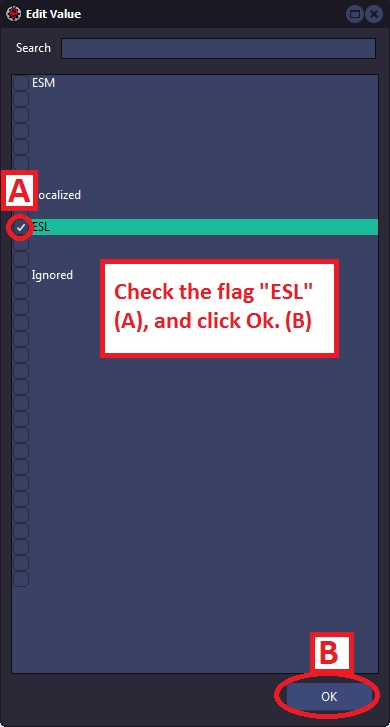
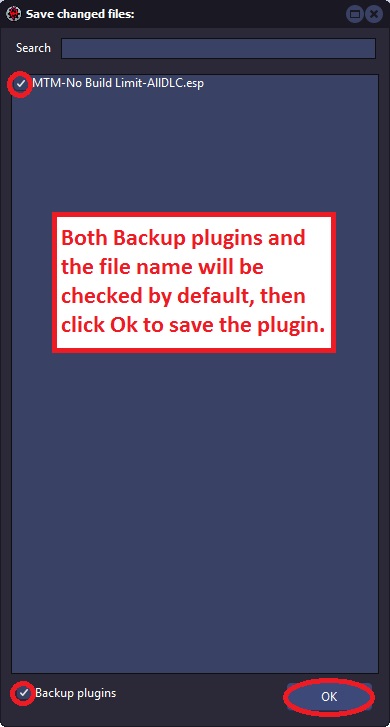
Click okay to save the plugin.
8.4 - Adding ESM flag to a Plugin
Check the box next to the ESM flag and click Ok.

Click okay to save the plugin.
8.5 - Changing Mod FormIDs
There are times in which you may need to renumber the FormIDs for all records in a plugin to avoid conflicts. This can become necessary if two plugins share the same FormIDs (or some of them), which can result in bad conflicts in-game. Renumbering FormIDs from will change all FormIDs of records belonging to the Mod-file (but not any override records which might be contained in that mod file) so that they start at the specified value.
This Function is useful if you have multiple modules that you plan to update in the future, but also want to always provide a merged version (e.g. using FO3Plugin). By assigning non overlapping FormIDs to the different modules, you can make sure that no FormID reassignment of conflicting FormIDs has to take place when merging.
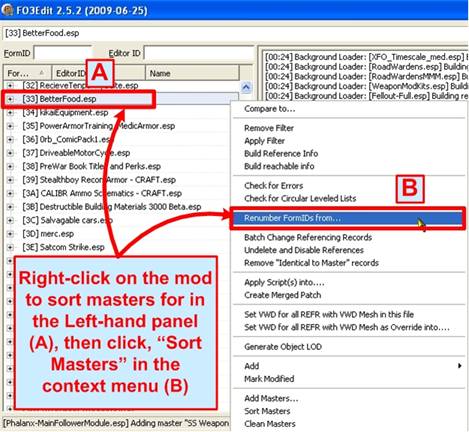
To renumber the FormIDs of a Mod file, Right-click on that mod file in the Navigation Tree to present the main context menu (A). Then select, "Renumber FormIDs from…" from the menu as shown in the screenshot below:
When selected, the function will present a, "Start from…" window asking you what number you want to start the renumbering at as shown below.

Normally a FormID is 8 characters long, with the first 2 representing the mod file's index and the last 6 the reference's specific index within that specific mod. Thus pick a number between 100000 and FFFFFF in hex:
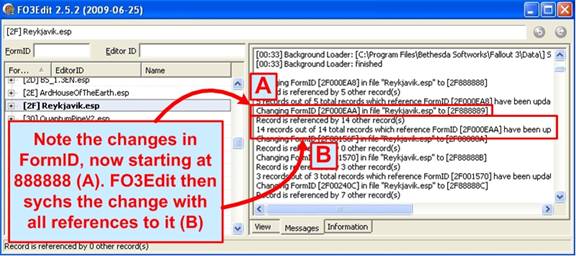
Once the new module specific start FormID (in hex) has been input (A) and the OK button selected (B), xEdit will begin changing the FormIDs and present the output in the Messages Tab as shown in the screenshot below:
When changing the FormIDs of a huge mod like Reykjavik by Alexander Sigurðsson, the process took 3-4 minutes on a high-end computer. The results shown in the Messges Tab reveal just a few examples of xEdit renumbering a FormID, discovering all references to it in all mod files, and correcting the numbering to prevent conflicts.
Note: Changing the FormIDs of an existing module will make it SaveGame incompatible and will break any other module that uses this module as master! If you have any dependant modules, you need to have them all loaded into xEdit at the time you change to FormIDs so that they will all be updated accordingly.
8.6 - Merging a Plugin into another Plugin or Master
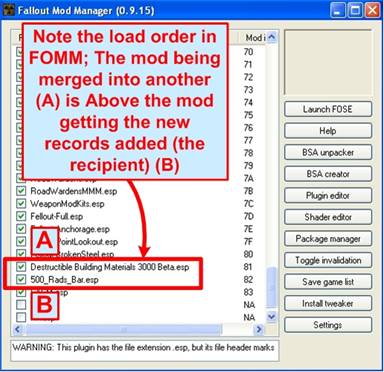
One of the common tasks that many mod authors face is the need to merge mod files together into a single plugin or master file. Many mod players also like to merge all of their favorite plugins into a single master file (one modder affectionately calls it, "BORG.esm"). xEdit can be used to accomplish both of these needs, and will ensure that the resulting plugin is synchronized correctly against it's combined references, and that the load orders are correct. The process is illustrated below, starting with loading FOMM and ordering the files correctly as shown below:
In this example we will be merging Skykappa's Destructible Building Materials 3000 ( WIPz) (here-after referred to as DBM 3000) into the 500 Rads Bar (WIPz), so that the Bar can utilize the destructible building materials. Note that Skykappa's DBM 3000 is a modders resource, and was released by the author to be used in other mods for the low price of mentioning in the mod's credits.
Load order is important when merging mods together, mainly because xEdit is very precise about the numbering and order of FormIDs and references amongst mods. Its is Very easy to conflict the FromIDs of mods being merged together (as is discussed at depth below). As such xEdit requires us to place the mod that is receiving the content (A) Below the mod being assimilated (B) in the load order of FOMM. This is important, but if you get it wrong don't worry, xEdit will warn you about it (also shown below).
You can also merge many mods into one at once, you don't have to do it one-by-one if you happen to have several mods that needs to be combined together (as in when a modder lumps everything into one giant BORG.esm). The only requirement is that the assimilator (BORG.esm) is at the bottom, below the assimilates. Once you have the load order correct, exit FOMM to save the load order.
Now launch xEdit, which should offer the list of mods in the correct order with the assimilator at the bottom as shown below:
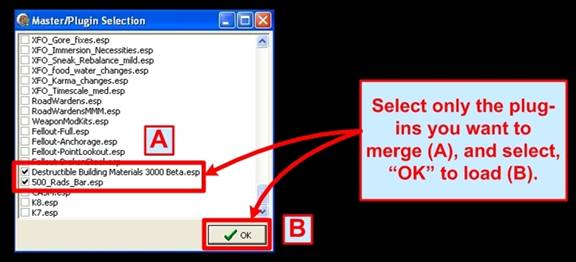
Note the load order is exactly as we specified in FOMM. If everything is checked, you can always Right-click in the Master/Plugin Selection window and click, "Select None" to clear all the checks. Then select the assimilator and assimilatees (A). Click okay to load the mods into xEdit (B), which yields the following output:
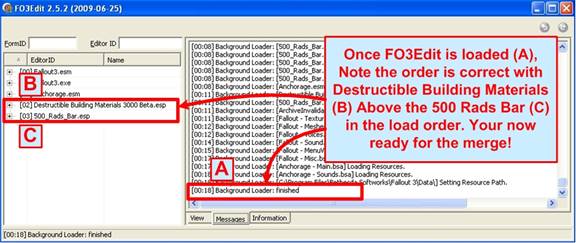
Note how the only files loaded are the main Fallout3 master files and the mod files we are merging together (B and C). We are now in a position to merge the DBM 3000 into the 500 Rads Bar!
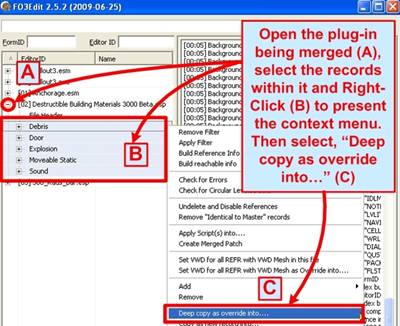
To execute the merger, first open the assimilatee's (mod being copied) by Left-clicking on its plus sign (A), and then selecting all of the record headings within the mod (B) using the mouse and the shift-key. Next Right-click at (B) to render the context menu, and select, "Deep copy as override into…" (C) As shown below:
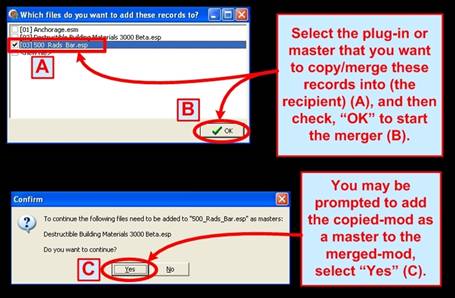
This action performs our traditional, "Copy" of the material we want to merge, and will present you with a menu option where you can select the file you want to merge these records into (our traditional, "Paste"):
When presented with the, "Which files do…" menu, select the mod that you want to Paste the content into (A), and select OK to perform the merge (B). You may be prompted to add the copying mod as a master, select, "Yes" to this (C).
You will now be presented with the output, which can be seen in the Messages Tab:
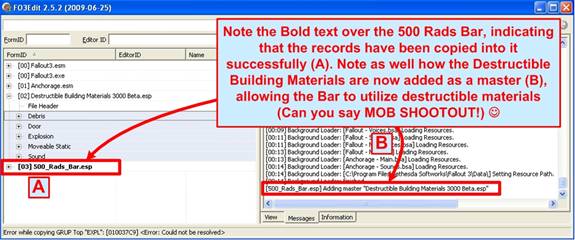
Note how the 500 Rads Bar now has Bold text over its name, indicating that new records have been copied into to and that it is marked as modified (A). The Messages Tab displays the output of any master connections we made during the process (B), and any errors that may have occurred (none in this example).
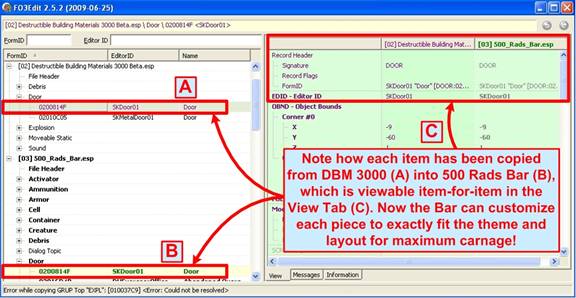
If you now open the two mods, you will see how the references from DBM 3000 are duplicated into 500 Rads Bar. Each record can be seen in the View Tab down to the variable and reference level, as shown below:
Each record can be compared in the View Tab as desired; showing that each has been copied into the 500 Rads Bar and will now save as part of that plugin. Any errors that occur will show up in the Messages Tab, and may likely prevent a merger from taking place. If you see errors in the Messages Tab, you should assume that the mods did not merge and you'll need to address the errors noted.
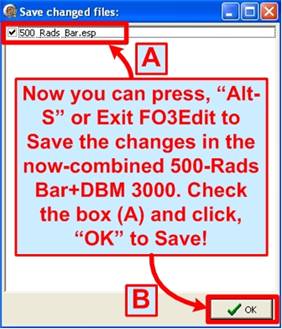
With the merger complete, it's time to save our newly-combined mod file! This is done most conveniently by hitting, "Alt-S" or closing xEdit. Either will present you with the Save Changed Files window as shown below:
Simply ensure the mod you just merged together is Checked for saving (A), and click "OK" to save the mod. Also note that the only file xEdit wants us to save is 500 Rads Bar, while DBM 3000 is not shown. This is correct behavior, indicating that we copied stuff into 500 Rads Bar and effectively did nothing to DBM 3000.

If you get the load order wrong in FOMM when trying to merge two mod files, xEdit will present you with the following error:
Note that the error is very specific about the load order issue, in an attempt to better guide you into the right load order for whichever mods you are trying to merge. If you see this error, exit xEdit, correct the mod load order in FOMM, re-launch xEdit and perform the merger operation again.
If you don't see any errors through the process or after saving, exit xEdit and either test the combined mod file or load it up in the GECK so you can start adding destructible building materials to your mod! Have a nice day, thank you for playing.
8.7 - Converting a Plugin into a Master
Converting a Plugin (ESP) into a Master (ESM) file is a simple process that can be doing using xEdit in less than five minutes. The file extension of a Plugin as well as the ESM flag within its file header must be changed in order to make the transition to a Master file. The screenshot below starts the action by launching xEdit:
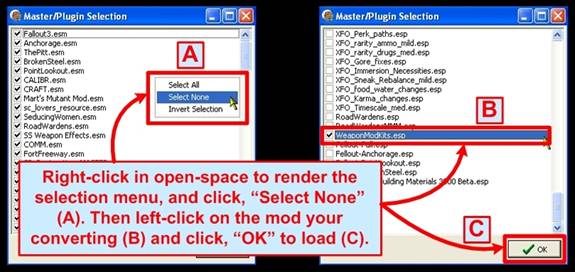
First you need to de-select all of the mods using Right-click in the Master/Plugin Selection window (A). Then click/check just the mod your converting (B), in this example we're converting Antistar's Weapon Mod Kits plugin into a master file. Click "OK" (C) to load xEdit with just the mod being changed as shown:
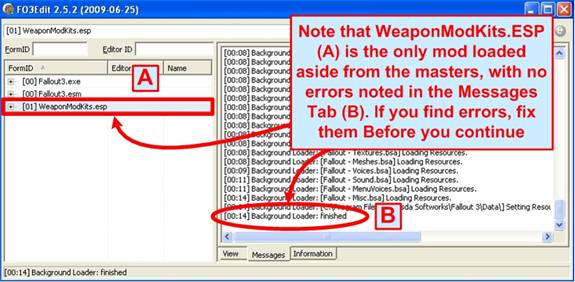
Note that Weapon Mod Kits is successfully loaded into xEdit (B), and that it is the only file listed aside from the Fallout3 master files (A). You are now ready to convert the Plugin into a Master file.
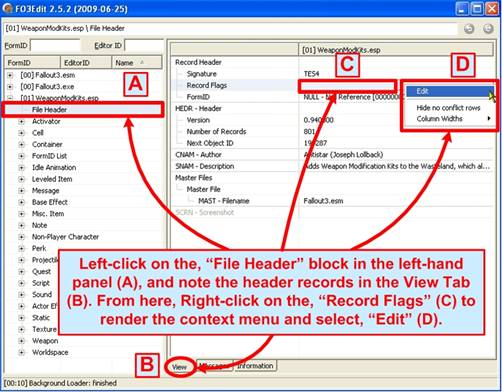
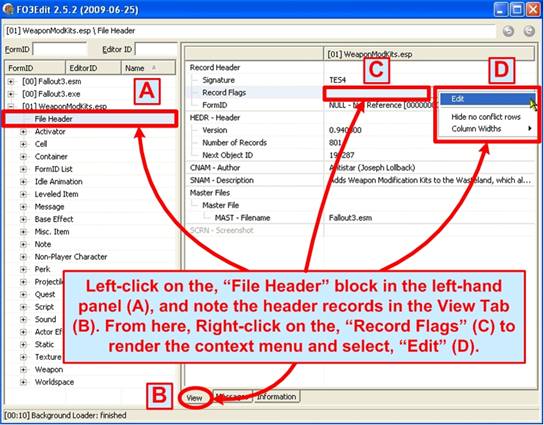
To make the conversion, all we have to do is change one flag in the File Header, which can be accessed by Left-clicking open the Weapon Mod Kits record in the Navigation Tree. Immediately beneath name of the mod is the File Header row (A) as shown below. You will then see the File Header data printed into the View Tab (B):
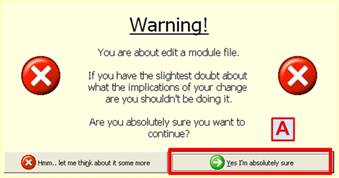
The File Header record is divided into different sub-headings and variables, including the Record Flags, Version, Author, mod Description and any Master file references that the plugin requires. We will be changing the Record Flags variable by Right-clicking into the open space next to it (C), which will render a small context menu. You can then click, "Edit" (D) to change the values. Doing so will present a warning window as shown below:
This window is a default/standard in xEdit, and exists to make sure that anytime you are about to change a mod file for the first time, you know about it. It may seem annoying to some, but often the worst conflicts between mods come from changes that a mod author did not intend to make. Simply select, "Yes" (A) to move along.
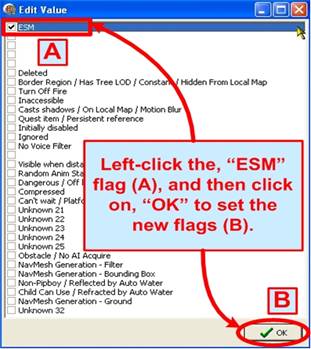
You will next be present with a menu of available/known flags that you can select:
Note that many of the flags are blank or unknown, because literally the community does not know what those flag values mean. Fortunately the flag we need is the first one on the list (A), simply Left-click it and then click, "OK" to save the flag settings.
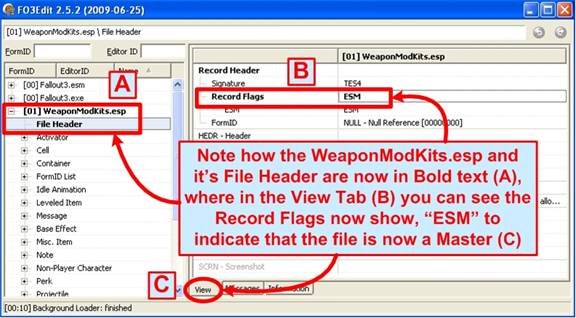
With that you are done! Note the File Header text is now Bold (A) indicating a change, and the Record Flags in the View Tab (C) show that the ESM flag is set (B).
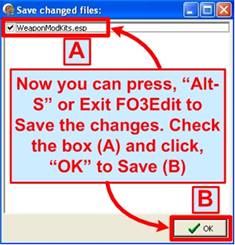
Once done with xEdit, you will want to change the file extension from Weapon Mod Kits.esp to Weapon Mod Kits.esm so that the extension matches the File Header flagging. The GECK and Fallout3 don't really care about the file extension (ESP/ESM), what matters is that File Header flag. The Extension is for humans to keep them sorted correctly! Now all you need to do is exit xEdit or press, "Alt-S" and Save your new Master file as shown below:
It is also possible to change a Plugin to a Master using just FOMM or other tools, but there is always the potential of problems with ONAM records. ONAM records are special records created that allow Master files to communicate with one-another when references need to be passed. xEdit ensures that as part of the conversion process, these ONAM records are built and correctly ordered. This is why it is better to make the Plugin to Master conversion using xEdit.
8.8 - Splitting a Plugin into a Plugin/Master Pair
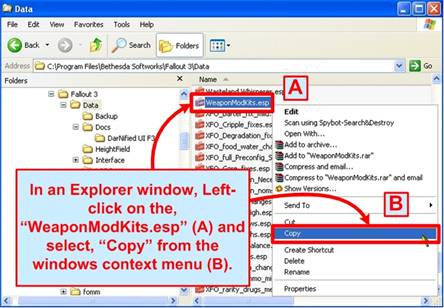
Splitting a single Plugin (ESP) into a Master (ESM)/Plugin (ESP) pair can be useful in many situations, especially when a mod author wants to share resources from one Plugin with other Plugins. The only way to share resources between Plugins is to convert those resources into a Master file. The split is a two-part operation in which you first split the single Plugin into a duplicate Plugin and Master at the file (windows explorer) level. You then change the Flagging on one of the two duplicates to turn it into a Master, and change the flagging on the Plugin copy to make reference its new master file. The action begins in windows explorer as shown below:
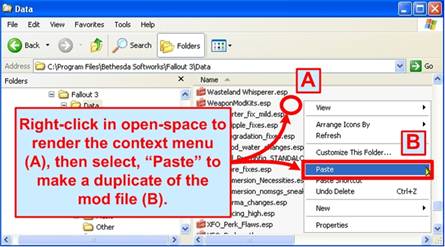
With the mod copied, the next screenshot shows the paste:
This will create a duplicate of the WeaponModKits.esp Plugin. This may seem a very basic part of the process to duplicate, but was done for thoroughness and for those who can't read English and depend on the diagrams for the process.
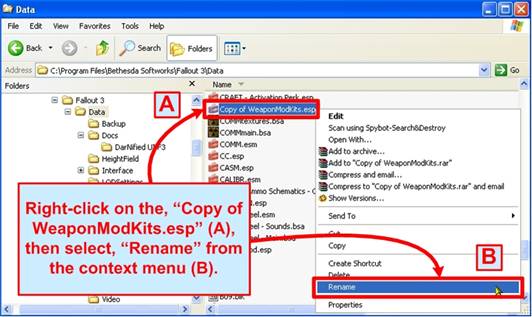
Now we need to re-name the copy to make it our Master file version.

You will be presented with a warning about changing the file extension, which is a common windows warning. Simply select, "Yes" when prompted. The screenshot below shows the last part of the duplication process:
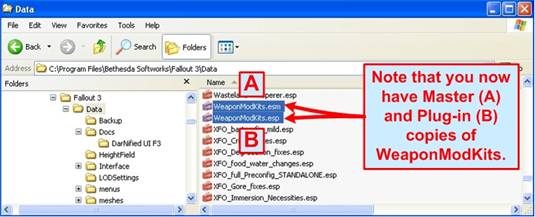
You will then be presented with the output; both a Plugin and Master file that are identical at this point. The screenshot below shows the Master (A) and Plugin (B):
With the file duplication part done, it's time to launch the Fallout Mod Manager ( FOMM) to set our loading order for the new Master file as shown below:
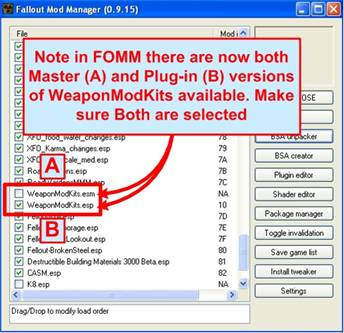
Once FOMM is loaded, find the WeaponModKits.ESP (B) and WeaponModKits.ESM (A) versions of the mod in the list and ensure that both of them are Checked/Selected to load. The screenshot shows how FOMM will look when first loaded after the split, showing the ESP (B) is still checked (as it was before), while the new Master we just created is not yet checked (A) as shown below:
Here you must also ensure that the Master (ESM) version loads Before the Plugin (ESP) version as this is a Fallout3 requirement. The recommendation is to move the Master (ESM) higher-up in the load order before all other Plugins, and load the Plugin (ESP) version of Weapon Mod Kits somewhere below the Masters. With that done, close FOMM and load xEdit. Your new load order with the Weapon Mod Kits.esm loading before the Weapon Mod Kits.esp should be visible in xEdits as shown below:

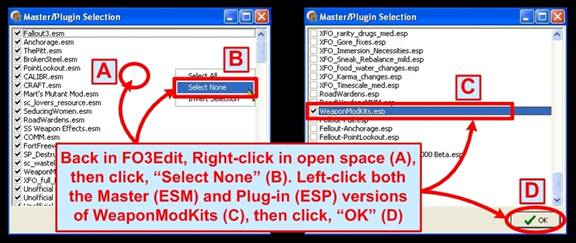
To load just the Master and Plugin, first Right-click in open space (A) and select, "None" from the context menu as shown above, and then check-off just the Weapon Mod Kits.esp and Weapon Mod Kits.esm files (C), and click, "OK" to load them into xEdit. This will load just the two Weapon Mod Kits files and the Fallout3 masters into xEdit as shown below:
Note that both our Master and Plugin version of Weapon Mod Kits is loaded and ready for conversion (A). The loader confirms a successful boot-up in the Messages Tab (B), indicating we are good to go for the conversions. Next we need to set the Record Flags to ESM (or Master) as shown below:
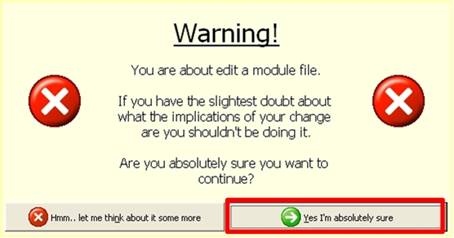
With the File Header block of Weapon Mod Kits.esp selected (A), Right –click in the open space next to the, "Record Flags" section (C) which will render a small context Menu. Select, "Edit" (D) from this small menu to add the ESM Master flag, which effectively converts the Plugin into a Master. Before you can proceed however, you will get a warning message from xEdit about changing the mod's contents. This is normal and provided for your protection. Simply select, "Yes" (A) to continue.

The screenshot below shows you the Flags menu that is rendered:
This, "Edit Value" menu shows you all of the known (and unknown) flags available for setting in a Fallout3 mod file for Record Flags. Many of the flags are known and can be selected, while a few still remain unknown. The only flag we care about is the, "ESM" flag (A), which you should check-off and then click, "OK" (B) to accept the new flag values.

Once done you will be presented with the outcome as shown below, which now has the Weapon Mod Kits.esp entry and its File Header in Bold text (A) in the View Tab, indicating the change. In the Right-hand View Tab (C), the Record Flag row is now also in Bold text with the new, "ESM" flag now populated with it (B) as shown below:
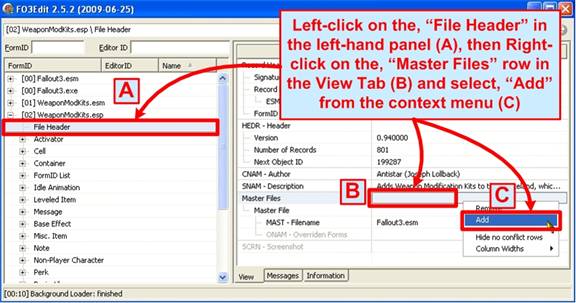
Next we need to add the new Master version of Weapon Mod Kits (ESM) into the Plugin version (ESP) as a master file reference, so that the Plugin references the Master. This will allow the Plugin (ESP) to use the Master (ESM) records going forward. The screenshot below shows you the first step in the process of adding a Master reference:
Note that we're changing the File Header section just as we did when adding the ESM master flag, but this time we Right-click in the Master Files row (B), and then selecting, "Add" from the context menu.
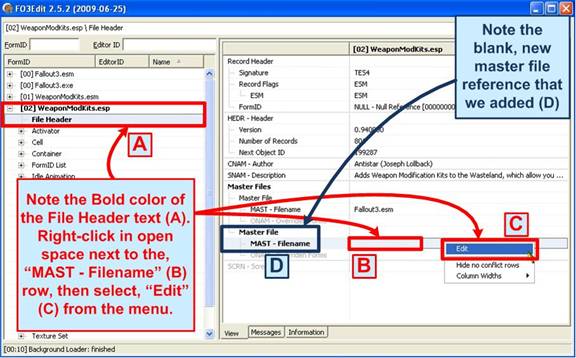
This will create a new, blank Master File reference in the Weapon Mod Kits Plugin that you can now assign to our new Master file as shown below (D), which we can then modify as needed. For our example we need to assign the new master file entry to Weapon Mod Kits.esp. To make the change simply Right-click in open space to the right of the, "MAST – Filename" entry (B), which will render a small context menu. Then select, "Edit" (C) as shown below:
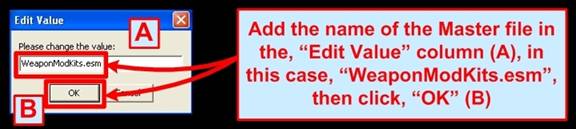
Clicking Edit will open a, "Edit Value" window, allowing you to type-in the name of the Master file you want to assign as the reference (A). Click, "OK" when done (B) to save the reference, which will take you back to the View Tab.
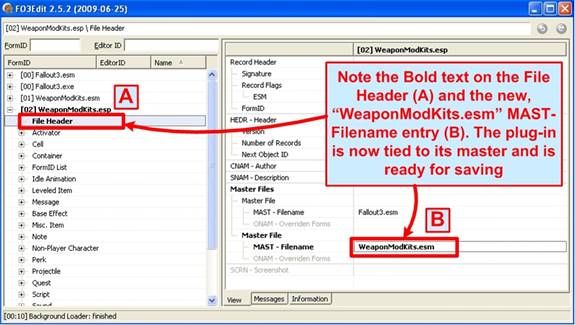
You should use the same case that the master file does, in this case, "WeaponModKits.esm" to ensure that there are no conflicts. And with that we're done! Note that the WeaponModKits.esm is listed next to the, "MAST – Filename" entry (B), and that the File Header also has Bold text (A) indicating the change as shown below:

And for the final step, you need to save the changes. Use, "Alt-S" or close xEdit to present the Save Files window as shown below:
With this, you now have a Master/Plugin version of Weapon Mod Kits, and the process works exactly the same for any mod that you want to split. You can change the esp file extension to ESM, then open and save it with the GECK and it will tick the ESM flag on, but won't produce ONAM's like xEdit will which are needed for any overrides to Fallout3.ESM's references. Unless your Plugin has no CELL and/or WRLD group, you're better off using xEdit.
Note: An .esp can be the master of another .esp.
Note: If you have a Plugin with multiple masters, you'll have to edit your GeckCustom.ini "bAllowMultipleMasterLoads=1"
Note: The GECK won't edit .esm's, so you have to ESP'ify, edit in GECK, then ESM'ify.
8.9 - Comparing Two Versions of a Mod
One of the common tasks that mod authors face is to compare two versions of their own mods, either during construction or in subsequent updates. There are also times when mod authors encounter difficult to solve problems with a new version of a mod, and need to revert back to a previous backup. The xEdit compare function can provide a valuable and convenient way of copying data from one version of a mod to another, without having to sort through records that don't belong to their mods. Whatever the case may be, this section is devoted to teaching you how to compare two versions of a mod file, and how to copy records over if the need arises.
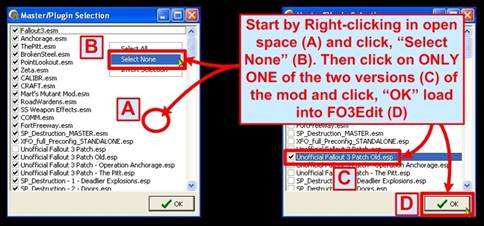
For this section we feature Quarn's Unofficial Fallout3 Patch, which has helped to resolve countless bugs in Fallout3 and has improved the gaming experience for thousands of modders. To start the action, launch xEdit and select One of the two mod files that you wish to compare as shown below:
As shown above, by Right-clicking in open-space in the Master/Plugin selection window (A), you will render the selection menu (B) where you can, "Select None". This will un-check everything on the list. Then select just One of the two mods (C) and Click "OK" to load it (D). The screenshot below shows the result:
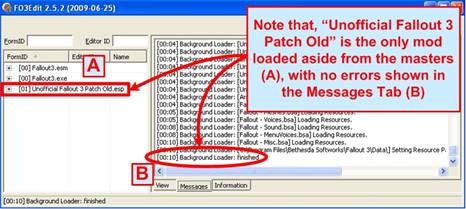
Here we have just One of the two mod files loaded along with the Fallout3 master files it depends on. We will need to hide these master files from view so that we are Only looking at the mod file that we want to compare.
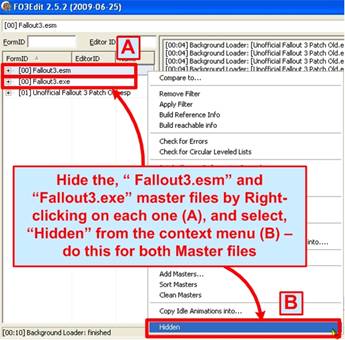
To hide the master file references from view, we need to select each one of them in-turn with a Right-mouse click (A), which will present the main context menu. There you can select, "Hidden" (B), which is the last option on the list as shown below:
You won't see any outward-change in the in the xEdit view afterwards, but you can confirm that they are marked as hidden by Right-clicking on them again – you will see a Check-mark next to, "Hidden" menu option indicating that they are hidden (from filters).
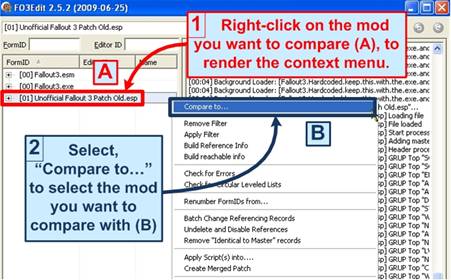
Next we need to load the other version of the Unofficial Fallout3 Patch mod file we're comparing (the new/current version). You can do this by Right-clicking on the loaded-version of the mod (A), which will present the main context menu. Select, "Compare to…" from the context menu (B) as shown below:
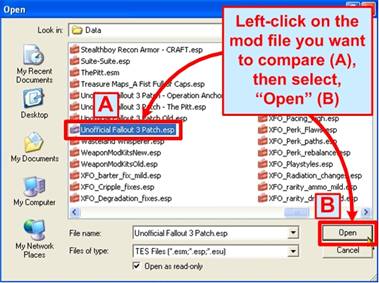
Selecting "Compare To" will present the, "Open" window as shown below, where you can select the current version of Unofficial Fallout3 Patch (A), and then, "Open" (B) to load it into xEdit as shown below:
The "Compare To" version of the mod is loaded as read-only into xEdit, so you will not be able to make any changes to it, but you can copy from it into the version of Unofficial Fallout3 Patch that we loaded into xEdit at boot time. You can change the order and load either/any version of the mod first, so that you can edit/copy records into whatever version you loaded.
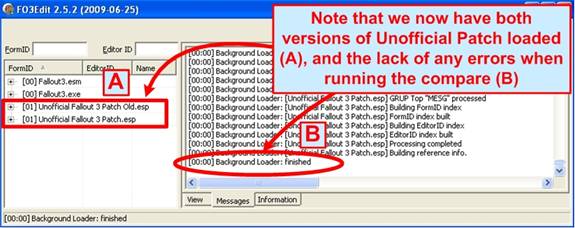
Once the Compare To function loads the other version of the mod as read-only into xEdit, you will see a view similar to the one below. Note the two versions that appear together in the Navigation Tree (A), and no errors noted in the Messages Tab (B):
With both versions of the mod now loaded with the Compare To function, the last step is to apply a Filter to find the changed records between them. Note that with the Fallout3 master files now listed as, "Hidden", they will not show up at all after we apply the filter – which is exactly what we want.
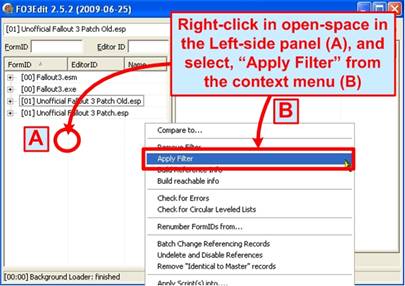
To apply a Filter Right-click in open-space (A) in the Left-side Panel to render the main context menu. Click, "Apply Filter" (B) to open up the Filter menu as shown below:
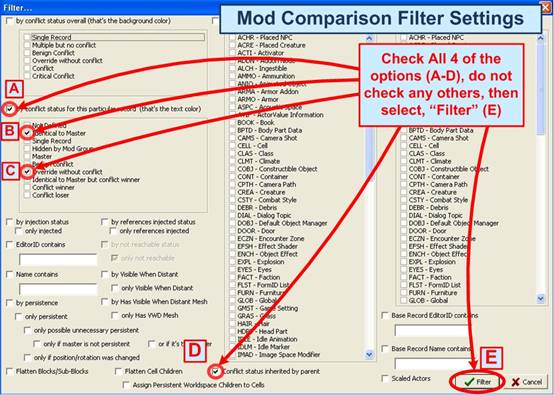
The main Filter window will render, where you can select the Mod Comparison Filter Settings as shown in the screenshot below:
Selecting the, "By conflict status for this particular record" (A), "Identical to Master" (B), "Override without Conflict" (C) and "Conflict status inherited by Parent" (D) sets the Mod Comparison Filters. You can then select, "Filter" (E) to apply the filter.

The Mod Comparison Filter should process quite quickly in most cases, unless you're working with a very large mod file. The screenshot below highlights the status bar, which will tell you how far along the filter operation are towards completion:
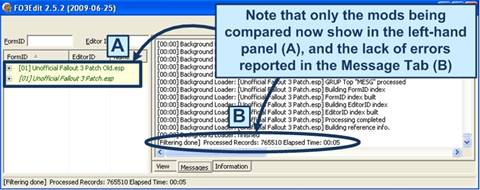
Once done, the screenshot below illustrates the result. Both versions of the mod (at the top level) have Yellow backgrounds in the Navigation Tree (A), indicating that they are not identical (of course). In the Message Tab we see that now errors were encountered by the Filter (B), along with some statistics:
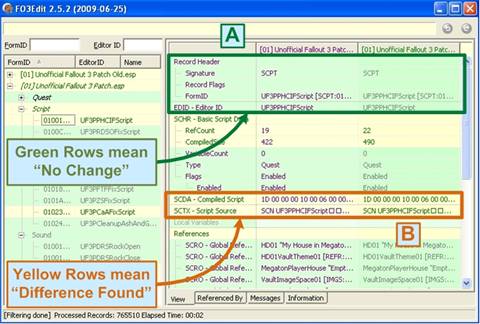
Opening one of the mods in the Navigation Tree and selecting a record highlights the similarities where they are identical between the two mods with Green backgrounds (A) and records that are different with Yellow backgrounds (B).
At this point we are done with the comparison. You can browse through the Unofficial Fallout3 Patch records between the new and old versions, and compare the differences at will. If you don't need to make changes, you can simply close xEdit when done.
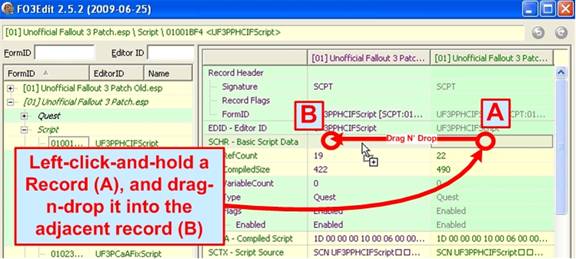
If however there is a need to copy records from one version of the mod to the other, the process below will guide you through the steps. There are a few limitations to be aware of, such as you can't drag-n-drop records from the version you loaded at boot time into the version you loaded with the "Compare To" function, but you can still copy from that version as shown below:
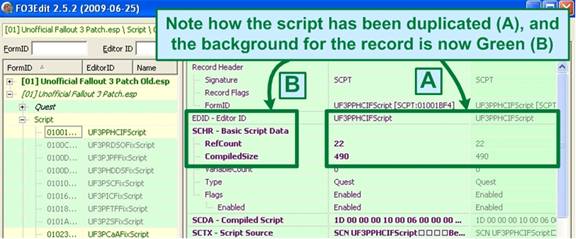
Here we Left-click-and-hold the record we want to copy with the mouse (A), and drag it horizontally to the mod we loaded when xEdit booted-up (B). Dropping the record into the row will copy that record (and all of its attributers) into the other mod. The screenshot below shows the results, with both sides now identical (A) and the background of both now Green (B) indicating they are indeed duplicates:
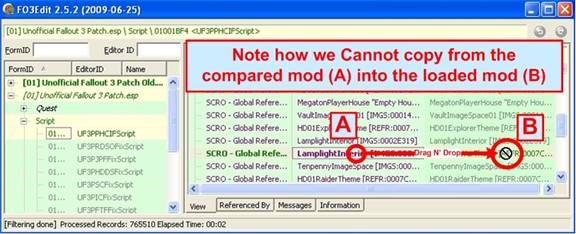
The screenshot below illustrates how xEdit will prevent you from drag-n-dropping records from the loaded version of Unofficial Fallout3 Patch into the "Compare To" version (which is loaded read-only). Note how when trying the drag-n-drop, you get a blocked-circle (B), indicating that you can't drop records into the read-only version:
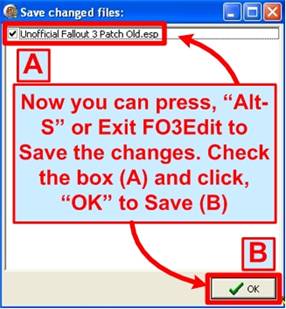
When you're done making changes, you'll need to save them. You can either close xEdit or press, "Alt-S" to render the Save Changed Files window:
With that, we're done with mod comparisons and updates! Of course you should not change the Unofficial Fallout3 Patch as that is for Quarn to do, but there is no harm in experimenting with the mods to learn the process (just make sure to have a backup of the files before you do!).
8.10 - The ESL Flag
8.10.1 - Important dangers when compacting FormIDs
8.10.1.1 - First Important danger when compacting FormIDs
Before you consider compacting a file whether or not you are a mod author or user understand compacting a mod changes the FormIDs. Once the FormIDs have changed that is the same as uninstalling the mod. Making certain changes may not affect anything while other changes will have a serious impact on the game and your save game.
The range of FormIDs is limited for ESL flagged files. Since there isn't much to work with as the FormIDs are renumbered you should consider this. They are renumbered sequentially. Once the process finishes you could end up with a FormID that is the same as the previous version, but the record is an entirely different record type then it was previously. Which may not just cause issues but render the save game unusable because of the changes unless you revert back to the version of the mod prior to compacting it.
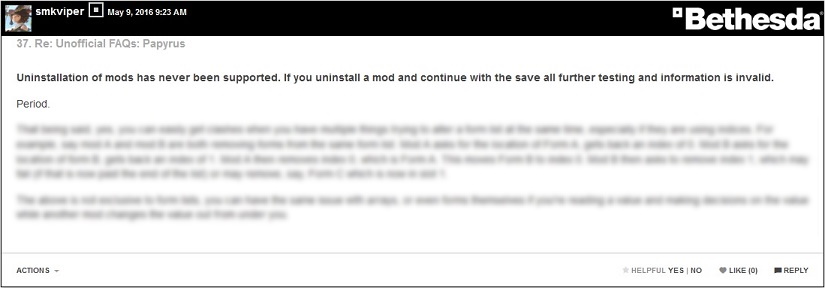
The bottom portion is blurred out because it is part of a 2 part question. The first being the effect and support of uninstalling a mod and the second the effect of changing a script and continuing to use the same save game. Smkviper is a Bethesda employee and Papyrus specialist for Bethesda having written in part of fully written the Papyrus engine.
While many people do uninstall mods and continue with a save game and it usually works fine, once you do, no matter what happens, any further testing is invalid and before reporting any issue to any mod author you should make a new save game. Period.
8.10.1.2 - Second important danger when compacting FormIDs
Patches to the mod will no longer be compatible because the FormID changed. It is not good modding practice to change FormIDs and then require other mod authors to create new patches. This is inconvenient for both mod authors and mod users. Example 2 below shows how a FormID that would not qualify for an ESL flagged file changes. This is what would happen for patches. Once the FormID is renumbered the patch can not find the old FormID anymore.
8.10.1.3 - Third Important danger when compacting FormIDs
You should not compact FormIDs if the mod uses GetFormFromFile(). The script will not be able to find the Form used by the mod author when he created the script. Below is an example from GetFormFromFile - Game in the CK Wiki. This is another example of how a FormID that does not qualify for an ESL flagged file could be renumbered as shown in Example 2 and cause the script to malfunction.
; Obtain form 0400ABCD we expect to be added by the KillerBees plugin
; Note the top most byte in the given ID is unused so 0400ABCD
FormList beekillerlist = Game.GetFormFromFile(0x0400ABCD, "KillerBees.esp") as FormList
; If "KillerBees.esp" is not loaded the form will be NONE. Otherwise, add our weapon to the list.
if ( beekillerlist )
  beekillerlist.AddForm( WeapBeeSlayer )
endif
In the above example 0400ABCD would not qualify to be in a file with the ESL flag. It would be renumbered and would be given the next available number in sequence as mentioned. For example it could be changed from 0400ABCD to [FE:004][005].
Sometimes mods use Bethesda Archive Files or .bsa or .ba2 files. Some mod authors do not provide the source for their scripts. To look for the GetFormFromFile() function you will need to extract the script files and if the source is not provided you will need to decompile the .pex files first.
This is not practical for users to look for in a mod. There are no utilities that will automatically look at the plugin, search for all the scripts used, and then go through a process of finding this function for the user and warning them of the dangers of compacting the file.
8.10.2 - When it is safe or not safe to add the ESL Flag
8.10.3 - Adding the ESL flag
• When an ESL flagged file also has the ESM flag and contains a new CELL or WRLD record, any mod (patch or otherwise) also altering the new CELL or WRLD record can cause items to disappear.
• Any file with the .esl extension will have the ESM flag forced at runtime. Files with the .esl extension will also have the same issue with CELL or WRLD records as mentioned previously.
• Compacting a mod and adding the ESL flag that has not been released to the public is safe.
• Compacting a mod and adding the ESL flag that has already been released to the public is not safe because compacting changes the FormIDs. Refer to Important dangers when compacting FormIDs.
• After compacting a mod with NPCs you will need to generate the FaceGen data for the NPCs with the Creation Kit because the FormIDs changed.
• After compacting a mod with custom voiced actors or NPCs, you will need to rename the Voice files because the FormIDs changed. Remember the file name for voice files is not contained in the plugin. You have to know what it is already or make a blank empty file with the CK in order to see what the CK will name it. After you know the name the CK has chosen then you can rename the voice files accordingly.
• For mods that use xEdit or zEdit scripts. Adding the ESL flag to mod files you will be processing with xEdit type scripts can impact how the script works. You should process the files without the ESL flag. You should be able add the ESL flag after the process completes. If you are required to run any xEdit type scripts each time you add or remove files in the Data folder this can impact how the script functions. You may need to remove the flag and add the flag prior to and after running the script which could be tedious.
The issue having both the ESM and ESL falg (or .esl extension) and CELL or WRLD records does not seem to affect Fallout 4. There is no word on whether or not this will be addressed by Bethesda for Skyrim SE.
8.10.4 - Adding the ESL flag for mod users
• Normally adding the ESL flag to simple weapon or armor mods is safe because they usually do not have patches and are not masters of other files.
• Adding the ESL flag to patches is safe because the patch only affects its masters.
• Adding the ESL flag to a mod that has a patch should not matter unless you compacted the FormIDs. If you did refer to Important dangers when compacting FormIDs.
• When adding a new mod to your load order and if you review Important dangers when compacting FormIDs first prior to compacting FormIDs then you should be able to compact the mod and add the ESL flag.
Adding an ESL flag to any .esp file that qualifies to have the flag is not safe to do when you do not know how that will affect the mod. There is no list of mods safe to flag and it is not appropriate to constantly ask mod authors whether or not it is safe to add the ESL flag to their mod. If you read through the section Adding the ESL flag and do not understand what any of that means then you should be cautious of adding the ESL flag to your mods.
If you feel you must add the ESL flag and have no other resources telling you whether or not it is safe then it is recommended to flag one file at a time and test it in game. If the mod malfunctions then you can remove the flag and revert to a previous save game.
8.11 - How ESL enabled games handle FormIDs for ESL flagged files
You might have already noticed FormIDs in some tutorial (for example removing cities from JKs Skyrim), while getting items via console cheat (player.additem) or somewhere else but dont know what they actually are. Heres one example:
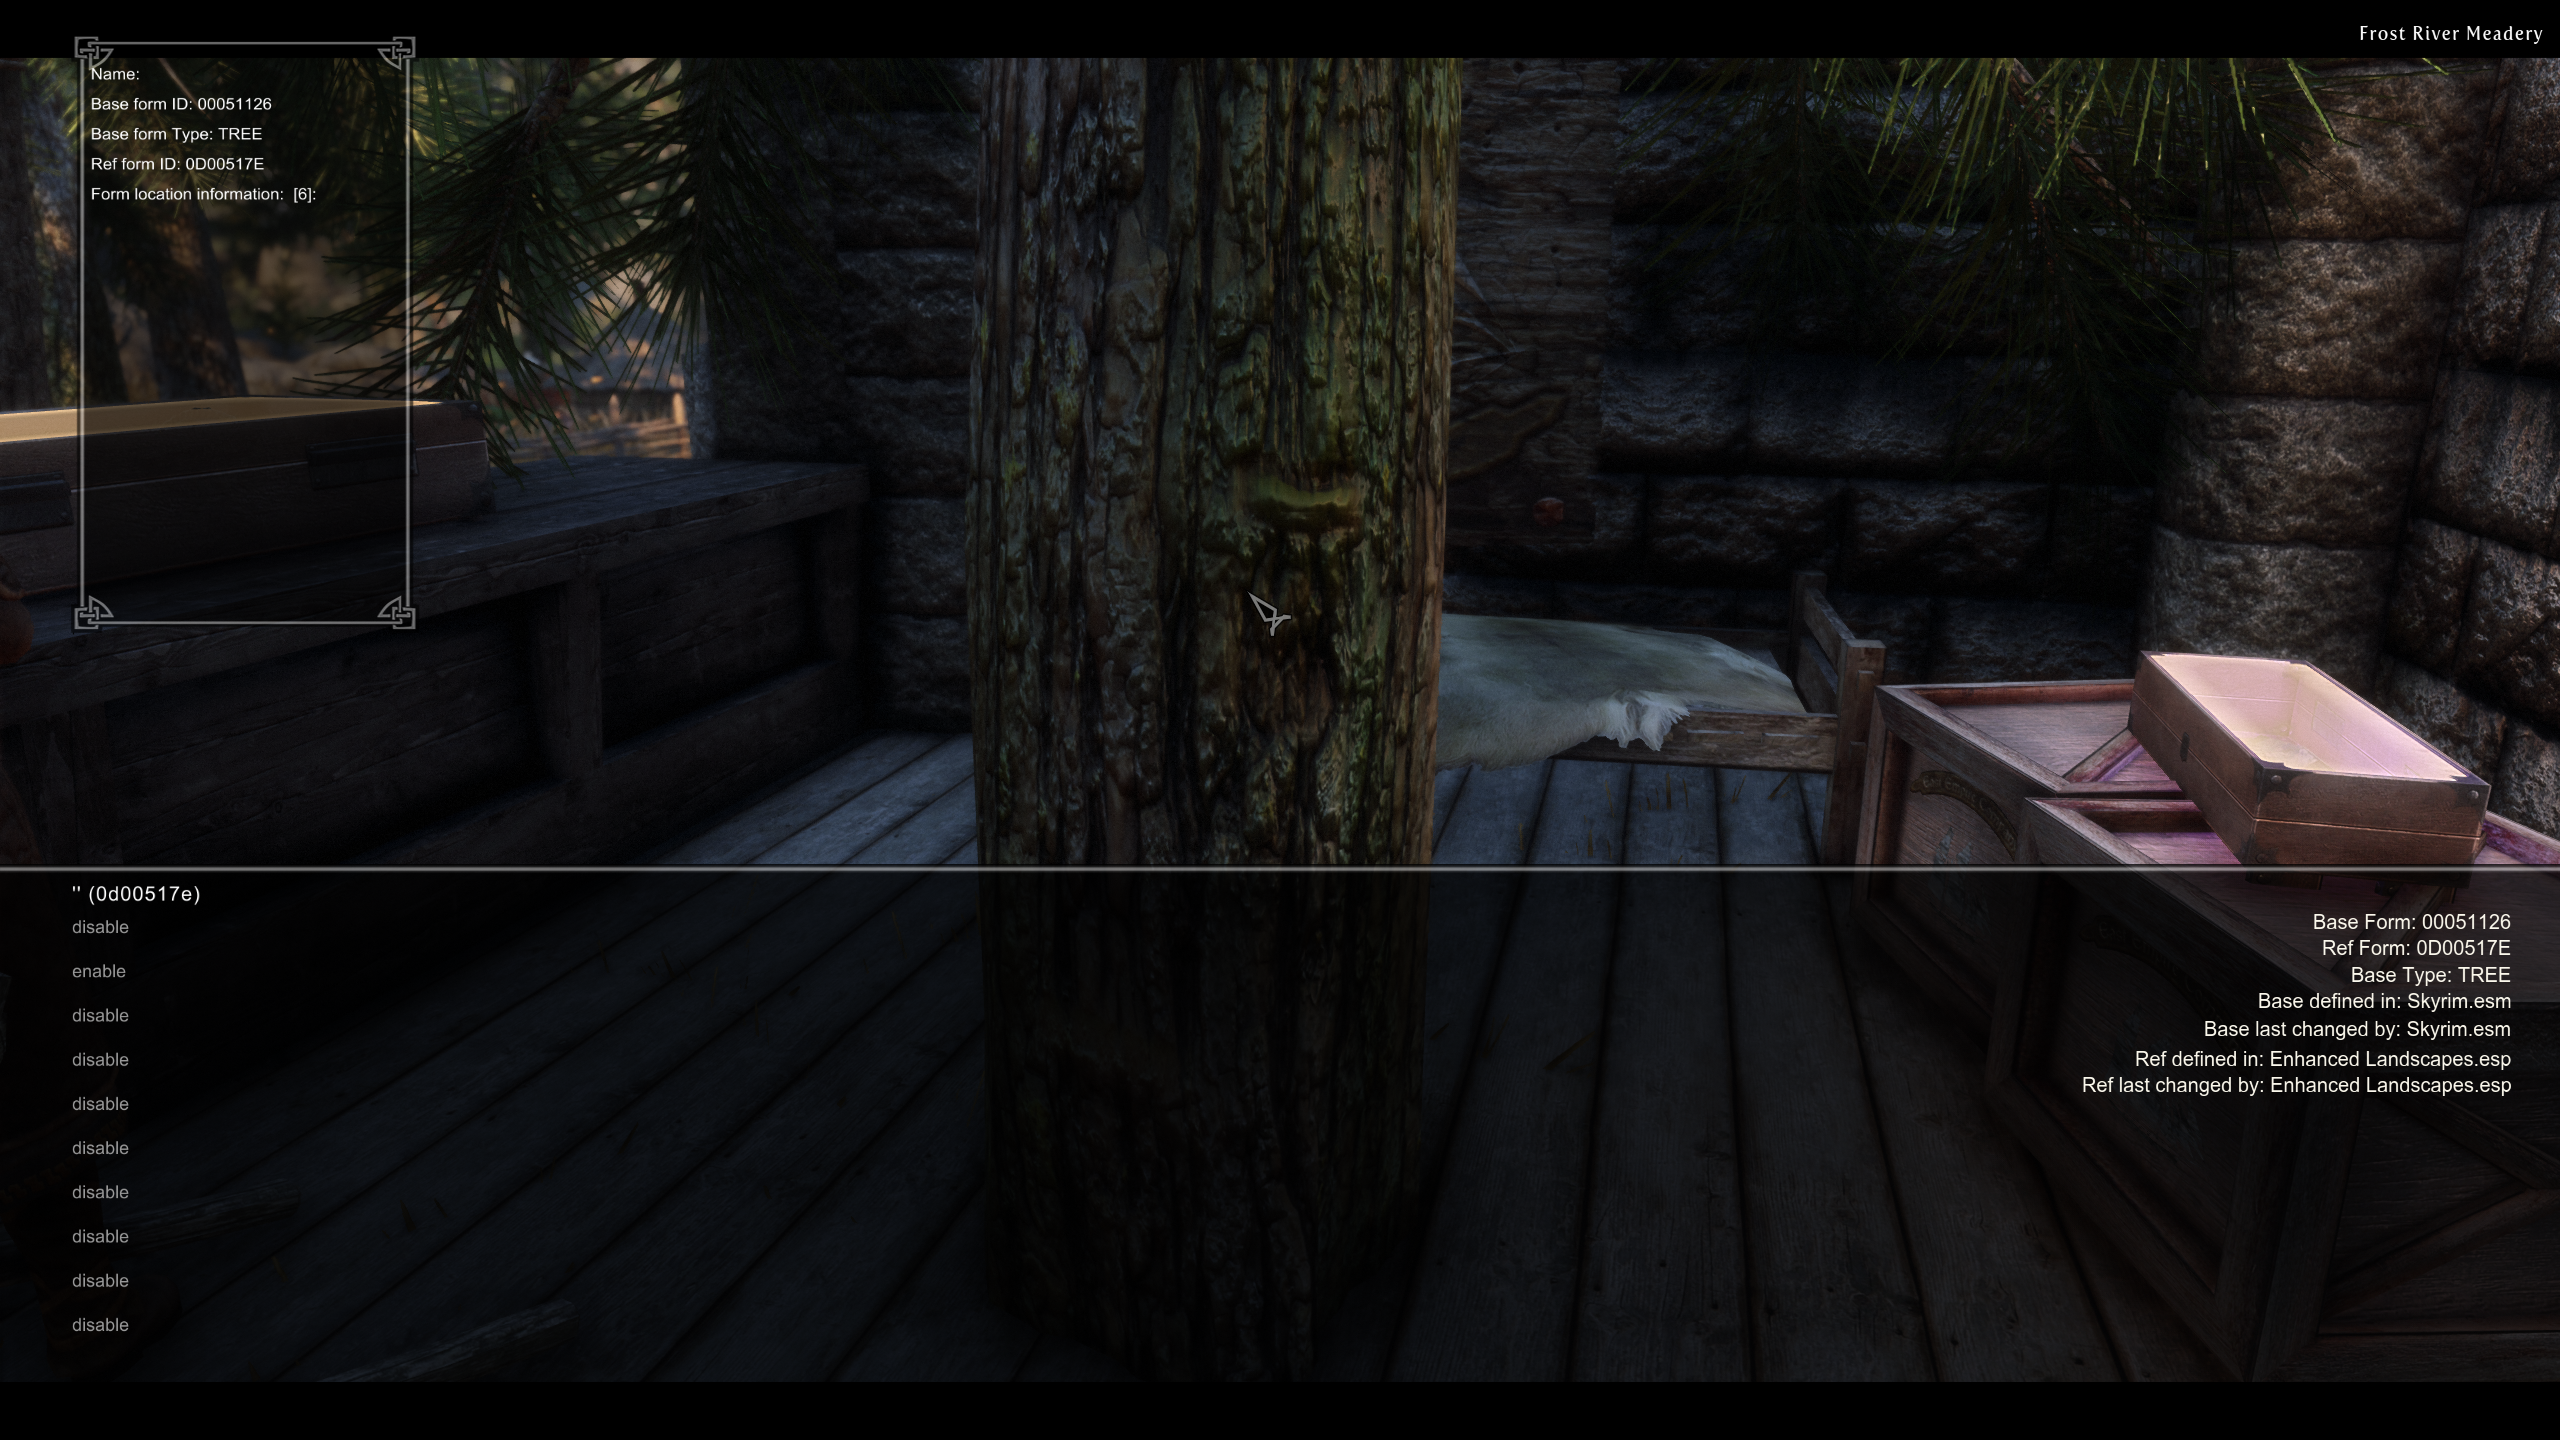
The interesting part is on the far right side: Base Form and Ref Form.
Lets stick with the tree that Ive marked in the screenshot for a moment. The Base Form (00051126) is an entry in Skyrim.esm and stands for TreePineForest05. It doesnt say anything about where the tree is located, about the size of the tree, its rotation or anything else. The entry in Skyrim.esm just defines a few basic parameters of that tree type like the type of the entry (TREE) and where the 3D model of that tree is located in the meshes folder of the game (Landscape\Trees\TreePineForest05.nif).
Now, if you got a mod (or the vanilla game) that places this kind of tree somewhere in the game world, that specific tree (like the one that is clipping through the floor in my screenshot) gets a Ref Form, which in this example is 0D00517E. For this you can define its position in the world, its size, its rotation and lots of other properties. The Ref Form is the FormID well be looking at. It can be divided into two parts:
[0D] [00517E]
The first part might look familiar for anyone using Mod Organizer 2 or any other mod manager that shows the load order of plugins like MO2 does. It defines where in the load order a mod is located using a two digits hexadecimal number. The mod with the lowest number gets loaded first, the higher ones are loaded later and overwrite the earlier ones. Your typical load order would look like this:
┌─[00] Skyrim.esm
├─[01] Update.esm
├─[02] Dawnguard.esm
├─[03] HearthFires.esm
├─[04] Dragonborn.esm
├─[05] SomeMod.esm
├─[06] SomeOtherMod.esm
│ [Other Files]
├─[0C] AnotherMod.esp
├─[0D] Enhanced Landscapes.esp (the one from our example screenshot)
│ [Other Files]
As hexadecimal digits go from 0 to F (F stands for 15) and as we got two digits, the largest number you can put together is FF = 255, just like the largest number for the decimal system would be 99. This is where Skyrims theoretical plugin limit of 255 comes from. Its actually a bit less than that but that shouldnt bother us here. This limit is what forces people to stop adding mods to their game or start merging them which gets trickier the more mods you want to add.
8.11.1 - How ESL enabled games address records within plugins
Now, what about the other six digits?
Those are used as addresses for entries (records) within plugins. The tree from the screenshot got 00517E, another tree might have 00517F, some NPC added by the same mod could have 077F20 and so on. These addresses within plugins are hexadecimal too, so the last address and highest amount of objects in one plugin would be FFFFFF, which is 16,777,215 in decimal. This means that a mod author could theoretically stuff over 16 million things (TREEs, NPCs, BOOKs, ACTIvators,...) into one single esp file. More than that isnt possible as we would be running out of addresses again but who needs that many objects within one plugin anyway.
8.11.2 - The ESL address format
So, were maniacs who already added as many mods as possible to our game and already start to get Too many plugins errors from various tools and the game itself. But, of course, theres at least twenty more immersion mods out there that NEED to be added to our mod list. And then theres those 50 patches for all our mods we forgot to install earlier.
In the past this would have been the point where we would have fired up the (undoubtedly cool) tool MergePlugins and trial-and-error our way through our modlist in order to combine as many mods as possible, just so we stay below the magical FF/255 mark. But now theres an alternative. Skyrim Special Edition does not only understand master files (those .ESM files from the main game and large mods) and regular ESP plugins (any other mod) that all count towards that 256 plugins limit but also ESL files (I believe the Creation Club mods come with these) and ESP files with the so called ESL flag. And while pure ESL files suck as theyre always loaded first and cant really be sorted, those ESP files with the ESL flags are gold and exactly what we need. They behave just like regular ESP plugins and even look the same from outside but theyre not loaded in a regular load order spot like [A4] or [0D] but theyre all squished into the [FE] spot, which now is a whole new address space by itself.
[FE:0A8]
├─[FB] RandomMod1.esp
├─[FC] RandomMod2.esp
├─[FD] RandomMod3.esp
├─[FE:000] RandomESLFlaggedMod1.esp
├─[FE:001] RandomESLFlaggedMod2.esp
├─[FE:002] RandomESLFlaggedMod3.esp
│ [Other Files]
├─[FE:0C3] RandomESLFlaggedMod196.esp
├─[FE:0C4] RandomESLFlaggedMod197.esp
│ [Other Files]
├─[FE:FA9] RandomESLFlaggedMod4009.esp
├─[FE:FAA] RandomESLFlaggedMod4010.esp
├─[FE:FAB] RandomESLFlaggedMod4011.esp
This is what the load order address of an ESL flagged plugin looks like. And this is what a bunch of ESL flagged plugins in your load order would look like:
Wait, what? Mod 4011?
As [FE:FFF] would be the highest address for an ESL flagged plugin and as the FE-part always stays the same as thats the position of the whole bunch of ESL flagged plugins in the regular load order, FFF is the maximum amount of plugins we can have in this address space. And thats a whopping 4096 of them!
This effectively means we're not limited to 256 plugins anymore but to 254 (as the FE-slot is blocked) plus 4096 = 4351 plugins!
8.11.3 - The Downside
As you might have guessed there has to be a downside. And of course you are right. As the address of the plugin itself in the load order now takes up five instead of just two digits, theres less digits left to address stuff within the plugin. Instead of six digits (000000-FFFFFF = over 16 million) for records we can use for NPCs, TREEs and other things inside our plugin we only got three digits (000-FFF = 4096) left. This gets clear when we compare them side to side:
Regular:  [0D]  [000012]
ESL-flag: [FE:00D] [012]
At a first glance this doesnt seam too bad as 4096 is still a large amount of records within a plugin. But theres a few problems that might be in the way. Let me demonstrate with three examples:
8.11.3.1 - Example 1
The hypothetical plugin in position [A4] we want to flag as ESL has three records 000001, 000002 and 000003.
[A4] [000001]
[A4] [000002]
[A4] [000003]
A plugin like that can be easily flagged as ESL as theres less than 4096 records and the records would still fit well into the ESL address space. There would be no issues and apart from setting the flag nothing else would have to be done. The result would look like this:
[FE:001] [001]
[FE:001] [002]
[FE:001] [003]
As the addresses within the plugin would not change, any patches or addons with that plugin as a master would still find the records inside theyre trying to reference to. In case you're wondering if the game notices the missing zeros, it does not. Leading zeros are ignored. You can test this by setting the weather via the ingame console with fw 0010a243 and with fw 10a243. The result will be the same.
8.11.3.2 - Example 2
The hypothetical plugin in position [A4] we want to flag as ESL got three records: 000001, 000002 and 0FA322
[A4] [000001]
[A4] [000002]
[A4] [0FA322]
A plugin like that cannot be flagged as ESL just like that. The records 000001 and 000002 would be fine just like in Example 1 but 0FA322 does not fit into the three digits address space of an ESL flagged ESP. The consequence of this: we need to compact the plugin to be able to fit in all its records. Theres a feature in xEdit that does just that. If we did that, the following would happen:
[A4] [000001] -> no further action
[A4] [000002] -> no further action
[A4] [0FA322] -> changed to [A4] [000003]
Again resulting in
[FE:001] [001]
[FE:001] [002]
[FE:001] [003]
Now all records fit into the three digits and the ESL flag would be set. You can do this to small patches and other uncomplicated mods that got no patches or addons themselves. Once such a compacted plugin got another plugin thats referencing to it we got a problem tho. Something in the other plugin could try to reference to 0FA322 but it would not find anything at that address anymore as that record was changed to 003. This could lead to various annoyances or even crashes. In the end, we would have to manually edit the patch/addon and change all entries of 0FA322 inside them to 003. Which would be really annoying as even small plugins not only got 3 records but dozens or hundreds of them. Still, if we know exactly that a plugin got no patches or addons that rely on it, compacting is still a viable way.
8.11.4 - Example 3
The hypothetical plugin in position [A4] we want to flag as ESL got more than 4096 records. This is usually the case for quest mods, large player homes and compilations like Immersive Armors. As our address space within an ESL flagged plugin is limited to 4096 entries we simply cannot set the flag or compact the plugin. Bad luck.
8.11.4.1 - ESLifying plugins
Now, what do we have to do to make use of ESL flags? First, we should ESLify all plugins that can be flagged without any further changes. For this we will need xEdit, just get the latest version from github. With xEdit there is an easy way to scan your load order for plugins that are small enough and dont need to be changed in order to get the ESL flag.
8.11.4.2 - ESLifying Plugins the easy way
This can be done for all plugins that are like in our Example 1 above. Youll need to start xEdit with the arguments -PseudoESL and -autoload. PseudoESL will display all flaggable plugins, no matter if they already got the flag or not, with [FE:XXX] load order numbers. This will be useful in a minute. Autoload skips the initial dialogue where xEdit asks you which plugins to load.
In Mod Organizer 2 you would go to the executables menu (the gear icon top left) and add SSEEdit.exe as a new executable like displayed on the left hand side. In Vortex it would look like on the right side.
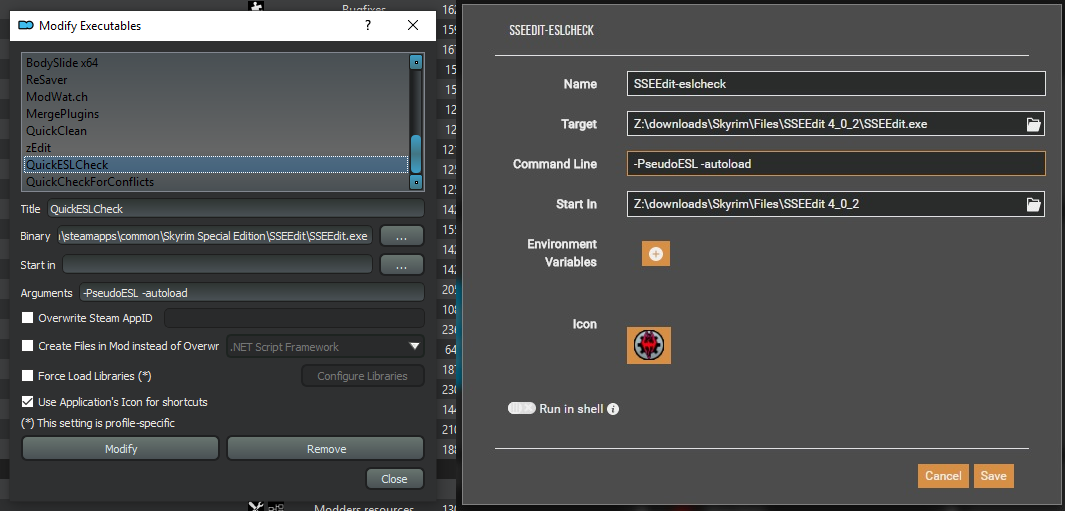
Now start xEdit with those arguments. For MO2 this works by starting QuickESLCheck from the dropdown menu, in the Vortex example it would be named SSEEdit-eslcheck but its really up to you how you name the link. After loading has finished were presented with our load order. We will now see three types of plugins:

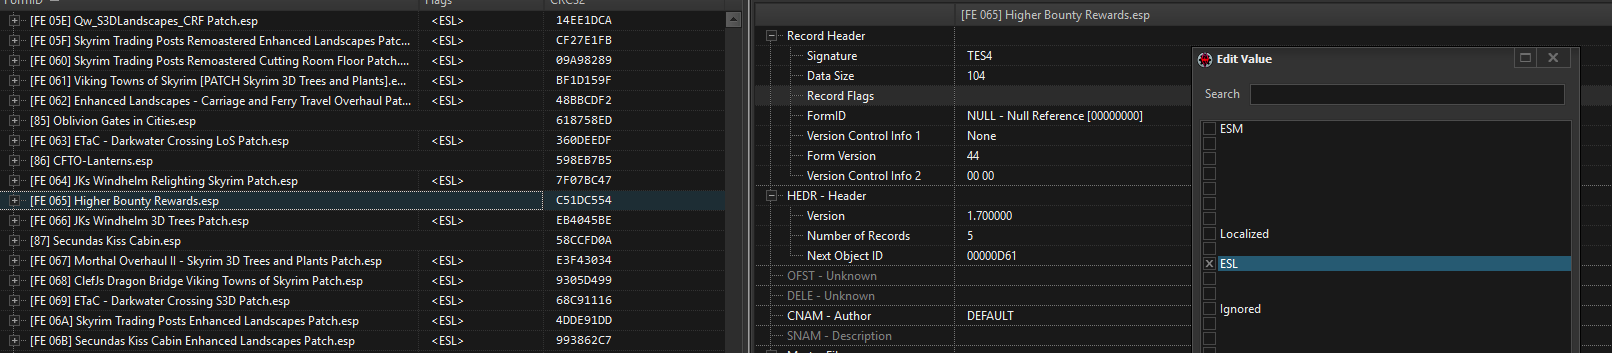
• Plugins like CFTO-Lanterns.esp arent interesting to us as -PseudoESL didnt give them a [FE:XXX] load order number. This means they cant be just flagged as ESL.
• Plugins like JKs Windhelm Relighting Skyrim Patch.esp got an [FE:XXX] load order number but they also got the <ESL> tag. This means theyre already flagged as ESL.
• Plugins like Higher Bounty Rewards are what we need. They got the [FE:XXX] load order number thanks to -PseudoESL but dont have the actual ESL flag yet.
We will change that. Click on Higher Bounty Rewards.esp (or whatever plugins like that show up for you). On the right side of xEdit you will now see some properties of that plugin like the Form Version, Version and Author. What were looking for is the Record Flag line. The one of Higher Bounty Rewards is currently empty. Right click the empty space and choose Edit. xEdit will present you with a couple of record flags you can set. Of course we will choose the ESL flag and hit OK.
You can now do this to all plugins that got [FE:XXX] load order numbers but no <ESL> flag yet. If you got a large mod list already type [FE into the search bar at the bottom to hide all the regular non flaggable plugins like [86] CFTO-Lanterns.esp, then you will just need to look for lines without the <ESL> flag.
Once you are done simply close xEdit. It will show a window with all plugins you have changed. Make sure all of them are checked and hit OK.
Thats really it, theres nothing more to it.
I re-do this check once in a while after adding a bunch of new mods to keep my modlist as ESLified as possible.
8.11.5 - Compacting plugins
Since the functionality to compact FormIDs is available from xEdit the process will be shown. However, it is not recommended for end users that are unaware of the dangers of compacting FormIDs. For more information see Important dangers when compacting FormIDs
Once you have flagged all possible plugins with the easy method above you should be fine for a while. At some point if you run into Skyrims plugin limit again, what you can do is a bit more dangerous so really think about the plugins you do this to. Again review Important dangers when compacting FormIDs.
Start xEdit the regular way, right click any plugin and choose Compact FormIDs for ESL. Now three things can happen:
• If you try to do this to a plugin that already got the ESL flag the option wont even show up
• If you try to do this to a plugin too large to be flagged as ESL youll get an error saying The file contains too many new records for this operation and nothing happens
• If you try to do this to a plugin with few enough records you will get a warning
If you get this you have found a plugin that can be compacted. The first line just tells you how many records will be changed. However, you should pay close attention to the second line of that warning. This tells you what kind of records will be changed and thats really important as some kinds of records will somehow break if you try to compact them. According to ElminsterAU you should really avoid compacting plugins when one of the following record types would be touched:
• INFO
• NPC_
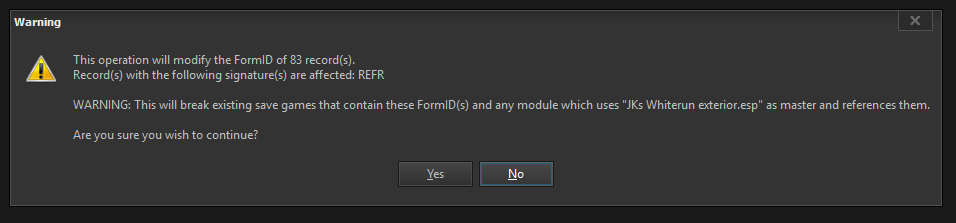
If that is not the case for your plugin make sure the file you are compacting is not a master of other modules. Because after compacting the plugin the FormIDs will have changed and other modules that depend on this file as a master will not find the records they are looking for anymore.
If you are sure about everything hit yes. xEdit will compact the plugin and lists all changes in the right side of the window, looking like this:
[00:02] Changing FormID [3300B865] in file "JKs Whiterun exterior.esp" to [33000CA3]
[00:02] Changing FormID [3300B867] in file "JKs Whiterun exterior.esp" to [33000CA4]
[00:02] Changing FormID [3300B868] in file "JKs Whiterun exterior.esp" to [33000CA5]
Now, if you are really thorough you could write down all the changes that have been made. Then you could compact plugins that are reference the module as a master. You could also check all patches for the plugin and update the FormIDs like 00B868 in the above example to what they were changed to during the compacting process. If you are diligent and knowledgeable enough you could compact any plugin that qualifies and save even more space in your load order.
Every update to the compacted plugin or plugins related to it will break everything for your current save game.
8.12 - Credits
• elwaps, for creating the additional information about .esl files